Showing posts with label ACW. Show all posts

Sunday, 21 April 2019

Just a very brief post today, as most things are drying.

I have managed to finish 2 of these figures. They are 15mm Alternative armies and to make the unit complete and finish. Just 2 cavalry I am afraid. But they add to the unit command and as such round the whole unit out.

I am still a long way from finishing the army. well not such a long way really. That aside it does finish another unit. Strictly speaking it should have a letter A-I on the flag. (J was used for John troop which was usually a recruiting troop so the troops were not fully trained! Or so I am led to believe, but take that with a pinch of salt as it is only what I have been told so may not be true at all.

As yet I have not decided if they will be 10th or 9th cavalry. Both of which were (I believe) called "Buffalo soldiers" by the Indians and both (again so I am told) had white officers!

I do have another small unit started so they will be along soon.

Complete Unit

 ELSEWHERE:

Ok the airship/zeppelin is currently drying and with luck I shall get another coat on this afternoon and allow it to dry overnight. Expect me to be saying that a lot!

6mm Cold war. been buying but not painting but expect that to change very soon. Once post arrives.


Tuesday, 6 November 2018

Full Circle!

Well you know what they say. "What  comes around, goes around"! And so it appears with me. I have slipped back into wanting to do "wild west" wargames.  As such there are 3 routes to explore.  Firstly cowboy skirmish games. I already have enough figures (who am I trying to kid... there are never enough) figures for that. I just need a set of rules I really like.  Maybe a few more apaches.. would be nice, but who knows.

The second thread is 15mm mass battles. I  know we tend to think of small skirmishes with up to 1/2 a dozen figures on each side. But Bigger battles did take place. Think "Battle of Little Big Horn!" for example. Peter Pig *(http://www.peterpig.co.uk/) Have just re-released a set of rules for that and to be fair. I am interested. It should be better that the "Hey you in the Jail" set I have from them. So that is something I shall definitely be looking at.

The third option, is to go non-historical. Yes we have Dracula in America,( Best place for him I should imagine). But we also have Westworld. Before anyone asks NO I have not seen the TV series! And this is an old conversion (way back about 6 years ago!) but I could be very tempted to do more.

So if I do Westworld I shall use the 7TV 2e rules. And shall buy some more "Fembots" just for the heads better to make conversions.

So in the future expect me to re-make my wild west terrain in bother 15mm and 28mm.

That's iit for now back to the paint table and the miniatures mine!

Monday, 2 April 2018

Part of Gettysburg Day 2.

Gettysburg today
At the club yesterday we played PART of Gettysburrg (day 2) Using the Fire and Fury rules. I was part of the Confederate attack I wasa to play the part of Hood and Peter was to play Mc Laws. Tim played the Union forces and his job was to stop us. Tims figures, club terrain and while not totally accurate it was good enough to get a feel of what was happening in the battle, back in July 1863.

Devils Den in real life
at the battlefield.
in modern times.
My objectives were to take round top and Devils Den. Peter was to inflict twice as many casualties on the enemy as we both took in reply. Both objectives had to occur within 10 turns this would be very challenging indeed. I measured the distance and no matter what I could not cover the distance within 8 turns, which was the original game length, I was about 20cm short no matter how lucky I got no matter what I did . Therefore Tim who set the scenario out boosted the scenario length from 8 to 10 turns. Still tough but at least physically possible without all my troops being Langford Christie!

And so the battle begins:
My starting position
My objectives not shown,
still in the distance.
Turn 1
Peter on the left
Me on the right.
Peter on my left
The rivers were streams and fordable
the whole length


Turn 2
All moving slowly forward
Ok me going as fast as I could
Turn 4
I am still moving as fast as I am able
 

Turn 4
Pete pushes forward and starts to inflict damage

Turn 5
I prepare to assault Devils Den
all the while advancing towards Round top
with a dream of getting Artillery to the top

Turn 5
Tim is struggling to move troops from reserve
Pete and Tim are now locked in a battle
and without support from reserve Tim tries to turn our left flank
with limited success

Turn 6
It is a close run thing
My asrtillery has now managed to destroy Tims guns
Tim has the position but is low on ammunitio


Turn 6
Peter continues to inflict casualties
he does however take some of his own.
Tim has a brigade in the woods which refuse to advance
 

Turn 7
Time Guns destroyed I can cross the stream
and begin the clibd up Round Top
mean while in rhe Devils Den I become low on ammunition
and "disrupted" which mirrors Tims troops

turn7
Peter pushes into the centre
while his left wing is forced to give ground
it is anyones game

Turn 8
I rally the troops and keep Tim "disrupted" and low on ammunition.
One big push an we shall have the devils Den


Turn 8
With Peters left wing in retreat and Tim following up
Peter is able to bring ALL his cannon to bear.

Turn 9
Tim holds Devils den as my first unit if pushed back
and retreats. My second unit is ready for another attempt next turn though.

Turn 9
Peter brings all 4 gun batteries to bear on a single unit.
It survives but drops to a "worn" classification.
Elsewhere Peters Infantry is slowly getting the upper hand.
Tims troop in the wood still don't move!

Turn 10
One last push and I succeed and hurl Tim back but not out of the Devils Den.
Tim Counterattacks and retakes the position.
Curses foiled again.

turn 10
On the Left Tin keeps pushing the left wing and peter keeps pushing the centre.
Eventually Peter's Artillery is just too strong.
but is it enough.

End Game

Conclusion:
At then end of the game I held Round top. But did not take the Devils Den.
we counted up the Casualties. We had lost a total of 27 stands, which is quite a lot
Tim and the Union had less than 54 stands!
So It was a Tacticle Victory to the Confederates.
Yes  we could have done better. But we could also have done a LOT worse.


Final thoughts: I need to get my 2 6mm ACW armies finished. As the rules were fine and the game was fine and fun.

Monday, 6 March 2017

Club game ACW (Fire and Fury)

Best Arial view of the battle BEFORE we start
I am in the Bottom left corner.
Yesterday at the club I played a game of Fire and fury. I have played it a few times last was about 8 years ago. I asm a big fan of the no fuss simple rules and would be happy to play more.

Anyway here is what happened!


The Rebels
Left to right are
Bob, Colin and Tim.


And the Union
Again left to right.
My seat, Peter (overall command) and Richard
by far the younger better looking and fitter players
(Stop hitting me Bob!)


My position.
My orders were to hold this ridge!


Slowly the Rebs advance on my position.
My artillery use is pitiful
Peter my Commanding officer tells me I actually
 need to put the metal balls in the guns!


Overall they advance. Bob leading the Way.
And peter coming off of the hill to
engage the enemy more closely
I thought he just wanted those 2 units to die quickly!


And still I wait.


They do creep closer.
Mostly due to bad dice rolls only letting them move at 1/2 speed.


The whole Reb line advances.
Peter looses 1 whole unit and the other runs back up the hill and
fills the gap it had left!


Bobs troops advance on the wood and the hill.
putting the left flank under a lot of preasure


Tim advances into contact.
First he fires at my gun battery and forces them to linber up
While in MY centre his BIG unit charges my weak unit
(Only 6 stands)

A combination of good dice rolls buy me
and bad dice rolls by Tim
forces the big unit off of the ridge line
My artillery is caught while limbered up and destroyed.


Tim was unsoported and his troops that had captured the gun battery
needed to withdraw
His Big unit reformed and charged up the hill again!
Curses!!

He ploughs into that unit and even managed to attck the on behind
The dice gods were not terrible to me but nor did they favour Tim greatly
But both units were pushed back


I was able to pivot my gun
but low on ammunition I rolled the dreaded 1

The Centre of the line Held
As Colin was very unfortunate and could
not advance sufficiently to put it under presure


The Union Left was badly battered and was about to be broken
by Bob. But we ran out of time


 Conclusion: Well we did run out of time so a final outcome will not be known. However, I was in a position to still contest the ridgeline and was even thinking of sweeping down into the left and supporting the Middle. Richard (on the union left) was not in such a position. He was holding on for dear life. (I am sure he will dispute that!) and Bob was pushing through. Both centres had hardly been touched and while Peter had lost a unit (and a half) because of his advance he was still in a good position.

We had to settle on and inconclusive draw. But it was a fun game and I am inclined to try to pick the rules up for myself.

All the Terrain and Models were supplied by Tim.
All the best hope to post again soon.


Monday, 31 October 2016

The Good the bad and the Ugly

Starting with the Good.

I was at the wargames club yesterday and I had done a deal with Matt. I am now the (Semi) Proud owner of a LOT of unpainted lead. Yay me! WE all like lead and this is something I am after in particular. About 2 and a half armies of un painted 6mm American Civil War lead, all Irregular miniatures and knowing Matt more ACW siege cannon that any club member could ever waggle a stick at. Ok Only about 8 guns in all but all whopping great siege guns in 6mm. I am only mentioning the siege guns as I have never seen them in a game of 6mm ACW.  There are also a LOT of Infantry and Cavalry and quite a few artillery. SO we now all know what I have planned for the next Analogue Hobbies Painting Challenge..... Most if not all the troops are undercoated already in a dark grey so I will probably re-undercoat in a lighter grey. And that is the good out of the way. But a very nice Good as far as I am concerned.

The Bad. Well there are a couple of bads really. The local council are looking to change the classification of the charitable status of the hall which may mean that after 30 years we are forced to either close the club or move the club. Only time will tell what happens so .... Moving on.

The second Bad is that I have not yet finished the latest turn in the Klintanistan Game. Sorry guys real life (and the rugby). I make no excuses, I just did not get round to it. The good news is the one person who got their turn in 2 hours after the deadline will not be penalised in the game now. I will get the turns ready end sent out NEXT weekend. Sorry about that just realife stuff getting in the way.

Now the Ugly. It is ugly because I forgot my Camera. At the Club yesterday Graham and Richard (called Dick in the club) played a game against Matt and myself. We played "Bloody Barons" by Peter Pig and while Matt and me were Yorkist, Dick and Graham were Lancastrian. here are some of the highlights.
  1. Poor dice rolls meant we were Defending.
  2. Dick has the King arrive and fight on his side. (darn it)
  3. First shot (Artillery) Matt manages to kill an enemy Household cavalry stand. No saves versus cannon so just blown away.
  4. Lots of our troops do not arrive in time for the start of the battle.
  5. Treachery means that a Lancastrian Noble considers changing sides and he need persuading to join the fight. This means our left wing is not under pressure at the start of the game. But he can join the fight 2 turns later. But te left wing did have a breather.
  6. I Fail to moyivate any troops for four turns in a row.... 2d6 with 2 or 3 being no motivation.... yeah bad dice rolls what can I do.
  7. Matt makes an inspiring defence of a town. Matt in the town only had levy troops and mostly archers. Yes being charged in the flank and being attacked by retinue quality troops managed to first hold the charge in one turn and then beat them off. being beaten by levy must have hurt them as they then failed a morale check and routed from the field. Three cheers for the levy troops.
  8. The following turn The Lancastrians attack the centre (again commanded by Matt I was still twiddling my fingers due to lack of in game motivation). Again a Brilliant defence saw Matts Retinue troops beat of lance armed Houshold heavy cavalry in the open. And as a bigger surprise they also routed from the field. Bye bye Lancastrian cavalry. Another brilliant defence by Matt.
  9. A Lucky (and I do mean lucky and not skilled) opportunity shot by my unmoving retinue unit close to the centre manages to kill the KING. (I called myself Kingslayer at every opportunity from then on!)
  10. I finally manage to motivate myself from now on.... Honest Matt it was the Dice I was not holding back despite what the opponents were saying. (It Really was the dice).
  11. I send my retinue from the laft most side of the hill and engage Dicks Retinue. As a peculiarity of the rules Once combat is met you can decide to carry on with your turn OR to fight it out there and then. I chose to carry on with the turn.
  12. The Yorkist cavalry motivate and being household troops get D6+1 action points. I rolled and got a six. So I sent them charging into a levy unit which had come out into the open. (This was the reason for my delay in sorting out the combat, as if I had failed to motivate or failed to motivate sufficiently I could have moved the Cavalry into a supporting position.)
  13. Crash band wallop. heavy armoured Knights against a peasant levy (Yes things could have gone terribly wrong but instead 5 enemy bases removed and no casualties to myself. The Levy routed from the field immediately.
  14. This bolstered me and with no side support the Lancastrian Retinue that my retinue wee fighting Also lost the fight and were swept away as well leaving the left wing with but a single unit to fight my pretty much undamaged horde.
  15. The Center Hill does get taken despite Matts best effort and they are pushed off of the hill. But as Mat was facing at that point 3 enemy units to the 1 he had irt was only really a matter of time. And matt manages to bring the last of our LATE reserves on just where they are needed and hold the line.
  16. The countdown clock reached the allotted time and the game was over.
We only had enough time left to pack up and not to work out victory points but it was clear to all players that the King was now dead and the House of York still had an intact army. The Lancastrians only had about 2/5ths of the starting bases left.

And that was the battle we fought yesterday. I know you would have liked some pictures but All MY fault, I have no camera phone (nor wish to have one) and I forgot the camera on the day. All I can say is sorry about that.

Monday, 9 March 2015

How to lose a campaign part 3

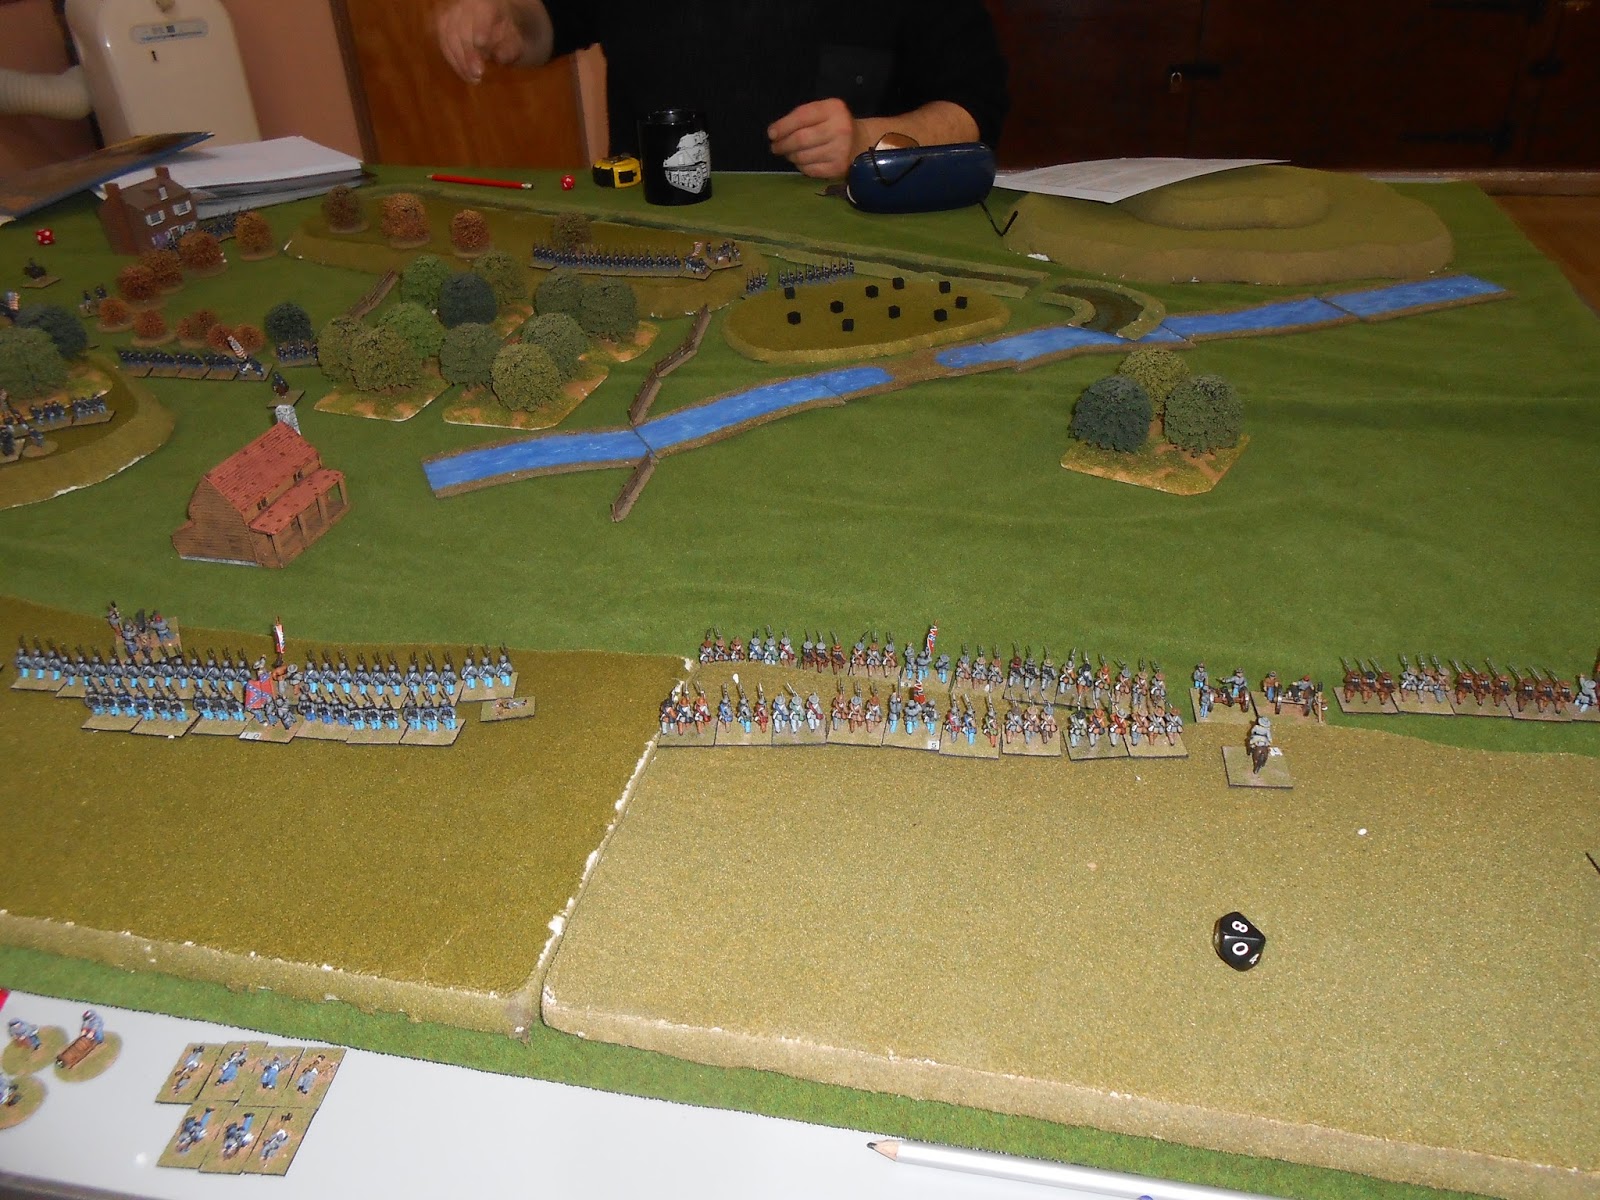
The table set up, Federal troops on the left.
Yes another lose for me and the federal troops. I have yet to win or even draw a game in this campaign and I swear I am not trying to lose it. I read the campaign rules last autumn that Graham had written and made the prediction back before a dice was rolled or a figure was put on the table that whoever won the first game in the campaign would win the campaign. So far I have found that to be the case. I am not having a go at Graham who wrote the campaign rules I really am not but I am enjoying saying "I told you so!"

2nd Objective captured on turn 2 by the Rebels.
Anyway here is what happened this campaign turn. I can already tell you what the result will be for the next one as well. But I will let you guess.

We are playing Civil War battles by Peter Pig. A very well balanced and good set of ACW rules. Not my first choice for rules but I do like them.

My 0ne victory of the day.
 The first upset for me was that as I was again defending I would loose troops from the table before the game started. I had a nice VETERAN unit in the 2nd Objective who rolled so badley they all had to start the game at 1/2 strength and off of the table. Oh well bad things happen in war. And I had 2 other veteran units. 1 started at 1/2 strength on the table, the other at full strength off the table. I did have 3 average intantry units as well and did have 2 of them on the table at 2/3rds strength.

So as Scott and Tim had already Captured the 1st objective in the start phase nothing I could do to get it back. So I managed to move (Just move) an average unit into the farm (2nd objective) to hold it. Almost immediately a veteran Rebel unit close assaulted them. My troops instantly turned tail and fled the board. So the second objective was lost on turn 2!

Foolishly I had put my cavalry too far forward and a second Rebel Veteran Unit managed to charge them, they fled but took some damage . They did stay on the board though. This meant that Scott was able to bring 3 confederate units altogether and keep forcing them back. No complaints my mistake for moving them there in the first place. Eventually by the end of the game they had been whipped out to a man with just nothing I could do to prevent it. Shame but I made the mistake so I will live with it.

Elsewhere on the board with 2 objectives held there was no way I could move the Rebs. This gave me the choice of trying and loosing even more troops of carry out a fighting withdrawal. With each of my units out numbered between 3 and 5 units to each of my depleted units I decided the base action from a campaign point of view was to withdraw.

I tried to get everything from the table while keeping everything in good order. I was still clinging precariously to the last objective. I had a 1/2 strength Raw morale Union Cavalry their and a single (Now Damaged) gun . At the other end of the board I had 2 guns (Undamaged) and a battered Veteran unit that started the game at 1/2 strength . The infantry would not get motivated enough to move from the table. So Scott sent his 5 Infantry units to budge them as he was intent on slaughtering them. Not that I blame him both confederate players played well. I was able to ruin one of his units (an average one) and make another fall back.

But the countdown had meant the end of the game. So another Federal Loss 45 pts to 48. yes just 3 points in it and if we had stayed and fought on the loss would have been FAR greater so with the exception of the bad placement of my cavalry I don't think we did badly. But a loss is still a loss.

The next battle will not see the campaign come to an end. But It will mean from now on I will have to pay full points for units that have absolutely no chance of remaining intact before the game starts. So win or lose the game after that will see what is now a VERY tattered  army take the field.

The way the campaign is set up I am now facing a snowballing steamroller and there is nothing I can do to alter that. Graham (Campaign administrator) will still insist that IF I get a naval battle I could win that battle. And true I still could. BUT my land forces are so battered that the Confederates will continue to attack no matter what happens in a single battle as they know there is nothing I can now do to stop them.

But I will play on.


Cheers for reading. Take care and have fun. All the best Clint