Friday, 6 March 2015

basing walk through.

I do not expect you to learn anything from reading this as it is probably already known but it is in stead a step by step walk through (not Guide) on how I do it. There are quite a few stages so if you are going to follow it be prepared to spend some time and effort. I can't really say more than that. Just follow the pictures read the notes and then if you choose leave a comment. You may well have a better way of doing any of the steps and I am more than happy to take any tips and hints from you as well.

This is just how I do it.

Step 1: I normally paint the figures before I start to paint as this allows me to get the brush round every corner of the model. But the two flamethrower miniatures are single figures so there was nothing to get in the brushes way so I was OK with these two!

Step 2: Superglue them to the base. I can and do use card, plastic and MDF bases depending on the Figures I am mounting and what the rest of the army has.

Step 3: I apply a thin layer of filler on the base. This is to hide the obvious step on the base of the figure and the top of the base. The Filler I use is ready mixed from the 99p store. It can be of variable quality but for the price I am happy to chuck it out if it gets too hard and a little water will not soften it to the right viscosity. It takes a while so leave it over night to dry, just to be sure. You may notice at this stage that the filler has shrunk away from the metal. If is is a small gap don't worry the next stage will fix that. If it is a bigger gap apply a second coat and again wait overnight or at least a few hours!

 Stage 4: Using CHEAP acrylic paint. I sue the big tubes you can get in "The Works" as One tube really does last a few years. To get the right flow (Viscosity) I water it down with some black ink. This makes it a good deal easier to paint on and creates a dark base from thick to work. While this is all wet from the paint and Ink that you have painted all over the base (except the edges) I dip the whole base in sand. Use the cheapest sand you can get it is just for texture and not the finished effect.

Having said that It will be better if the sand has dried out and is not wet itself as it clumps up if it is. So I have a bag of builders sand in the shed and have sifted it  weeks before needing it and put it in a separate container. Better safe than sorry.

 Step 5: Once the paint and sand is dried (again I leave it over night) I re-paint the base with the cheap Ink and cheaper paint (from the works). This seals it all in nicely. Other people will suggest using PVA (White Wood Glue) but I do not find that nessercary. Paint and Ink works just as well if allowed to dry. By using the Ink and the Paint any small holes will also be filled with sand and this will seal them in and at the end you will never know.

Step 6: "Drybrush" the base coat green over the while base. Don't feel you have to wipe any paint of off the brush. at this stage it does not matter if you have a few patches of green that are lighter than the rest. There is still a long way to go.

Stage 7: Using your darkest brown add some paths. Literally just brush it on as you want the brown to act as a base for later colours.


Stage 8: Using a lighter brown I dry brush the paths. And Using a lighter Green I do the rest of the base.

Stage 9: Repeat stage 8 but using progressively lighter tones. I tend to use 3 extra tones. I know it works with less but it is the habit I have gotten into.


 Stage 10: for the final highlight I use pure yellow on the grass (as I Make each stage progressively lighter using yellow and not white.)  While for the paths I end up with a flesh colour as the top highlight. But the yellow and the flesh paints are done very lightly more a hint and anything. I also don't apply them everywhere. Go and look at some grass and dirt you will see what I mean as it will show every lump and bump as the sun hits it. And It just looks more natural if it is uneven this way. Yeah I know it's work but it really does not take long and to my eye does look right !

Stage 11: I use small clump foliage in a variety of greens ripped into very small pieces but no larger than the waist of the figure and dot two or three to each base. Simply use superglue for instant fixing and don't worry if it goes across more of the base than you first wanted as the superglue will dry clear and shiny. Once this is dry this is your LAST chance to tidy up the figure if you got any grass paint on the figure. So Tidy up as required it does not take long.

Optional stage 11a: Sometimes I will use static grass as this stage and sometimes I will not. It depends on the model and how I feel about it!

 Stage 12: The reeds. For the reeds I use a purpose bought wallpapering brush. It came from Wilkinsons and cost a massive £1. As You can see I have used about 1/2 of it and have used it on 2 armies so really when compared to metal figures is cheap enough for the job. Do not use  anyone else's, buy one for yourself as it will last  and if it is your own no one will complain if you start cutting pieces of off it. And I don't want anyone to get into trouble, and that includes me.

Stage 13: As you can see in the pictures I find it easier to work in clumps of reeds rather than one at a time. I just get 15-25 bristles and cut them all straight with scissors and using superglue hold them in place and viola they stand upright on the models.

This is the tricky bit. Holding them firmly with one hand I again using small scissors cut them to the required height. My advice is to cut them short as the longer they are the more chance they will come off. Say about 5-7mm for a 15mm figure. Occasionally they will not have stuck properly when you cut them. If they all fall over when cut I just drop superglue on them and the reeds look like they have been trampled by something . If some come and some stag I generally apply another drop of glue and reposition the intact reeds in a clump. If you can get the glue on the ones that stood up anyway and IF you put the reeds at ground level that may make them all stronger when you com back and re-cut them. It really is practice and don't expect them all to come out perfectly. They never do.

The other advantage to cutting them is that it allows the reed clumps to be used more than once and we can always do with saving money at time.

Stage 14: I apply a spray mat varnish at the end. This not only protects everything some what it will also help seal everything in. It also has the additional side effect that any superglue ONCE FULLY DRY that has oxidized and given a glossy finish or has some small white flecks will miraculasly turn to a matt finish.


Like I said It is a lot of work and when I have been asked face to face the guy did walk away saying it was too much like work. His choice of course, just as it is your choice to take and use or just discard any or all of the stages that suit you. This is just what works for me.

Thanks for your patience in  reading this.

Have a good few days and I will post again soon. All the best Clint

Wednesday, 4 March 2015

Engineering Paras and extras.

And so my US Para company comes to an end with yet another platoon, this time the engineers Platoon.

As you can see I have Lt Spiers in command this time. Dave Docherty (curse him) supplied the name of an officer of Dog company so I felt forced to include him. Which would mean these are the 101st regiment and not the 82 "All American" regiment. But I will use them as both.

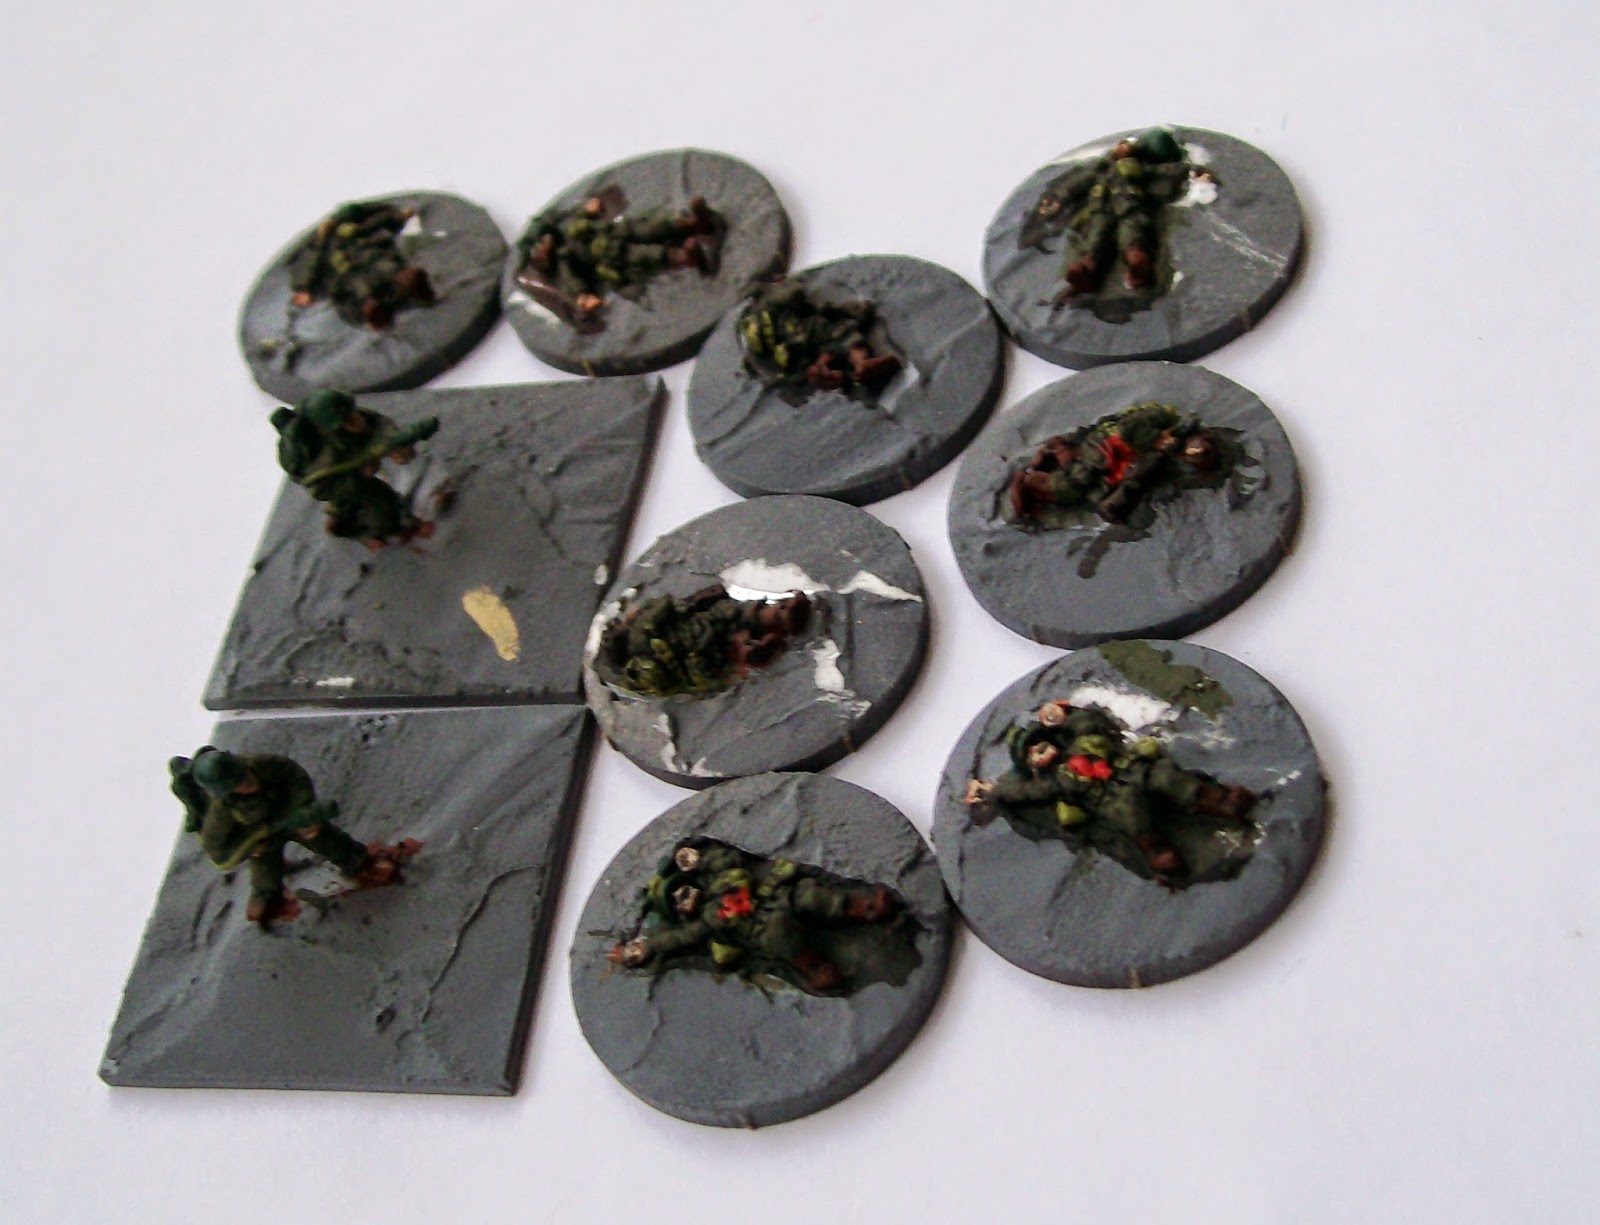
The engineers platoon consists of 7 bases including the lieutenant command stand. I am sorry to have to admit this command stand has M1 Carbines and not Thompson SMG, just because I ran out of SMG figures. But perhaps the M1 will make a nice change. So other than the command stand we have 3 Garand Rifle stands and a .30 Cal LMG stand and special to the engineers 2 flamethrower stands, But No Bazooka stands (Shame).

Having never used a flame thrower in the PBI rules I have no idea how good it will be but I am hoping it will be able to make any armoured vehicles think twice.


 The very knowledgeable among you will realise that the flamethrower figure is not actually in Paratroop uniform. But at this scale I am not going to worry about that as I knew my opponents will not either. For those of you looking to stop the difference it is most clearly in the boots, the helmet and the knees of the trousers. For those of you not worried, well done as it is only a playing piece after all. While all the other figures are Battlefront the flame throwers are Peter pig US Marines! I have only a single figure on the Flame base as let's be honest no one wants to stand too close to such an explosive bullet magnet. Well would you?

In addition the Peter Pig rules require dead markers so here are 8 dead counters. These  are the figures that you paint but hope never to use, but you have to have anyway. But with me in charge they will get a lot of use I am sure. In Fact I may need to go and buy some more! Yes perhaps I should put another order in right now!


As I had spare figures I also made 5 additional .30 Cal stands. This will allow me to swap out some of the BAR stands if I choose to give better LMG firepower. In the rules you can mix and match LMGs in the same Platoon as long as you do not go over the limit of 3 per platoon. So this option may well pay dividends only time will tell.


And Finally I have an assortment of figures made up into stands which technically I do not need but again you never know and it is a case of using up spare figures. And as I get points for them in the Painting challenge it made sense to do so.

So an extra SMG stand* a bazooka stand and another Rifle stand. I know I said I had run out of SMG figures for the command stand (Lt Spiers) but if I had used it there they would have been in identical poses and I would have always looked at the stand with an unformed question on my lips.

So that folks is all of my 15mm US Paratroopers for PBI. I will try to do a basing walkthrough on Friday so until then, take care, have fun, try to roll some dice and shove figures around the table.

All the best from Clint


Monday, 2 March 2015

US Paras part 3 Guns

Firstly I am changing the page banner still trying to find one that works for what I want, please bear with me.

Ok so carrying on with my 15mm US Paratroopers for Peter Pigs PBI rules. Today I have 2 57mm Anti-tank guns and crews. These are not the best guns in the rules or in the game or even in real life. Having said that they are not bad at all and will keep tanks and other armoured fighting vehicles at a distance.

2 stands of infantry with them both as additional crew and to carry ammunition and also to swap the enemy infantry from over-running them quite so easily. While they will struggle against the "Big Cats" of the German army they should be able to knock out Panzer 4s and the like. And I have included them in my  force as they were glider bourn. Only 2 of them as they were spread throughout the regiment and would not me given in great numbers to a company command.


 Also today 4 M1a1 75mm Howitzers. Again with a very light weight chassis they were hardly ever towed but instead broken down and shipped in pieces in WW2. One of the versatilities of this gun is the ammunition. While you do tend to think of High explosive for these guns they could also fire smoke and even Mustard gas. Although I have not found any evidence of mustard gas being used in Normandy during WW2. But the more I tell my opponent about it the more terrifying these become!

I have 4 not because they were more common than the anti-tank but because Peter Pig sells them 2 to a pack so it was for economic reasons really. In reality I probably should have just bought 1 pack! Too Late now though.

All the guns are on FOW bases simply because I had some spare and they fitted on quite nicely. I still have some spare and you just never know what they may be used for next.

Next post should be my final (stop cheering) US Paratrooper PBI post as I have now completed the Engineering Platoon, Which sounds a lot more interesting than it was. So I will do a walk through of how I do the bases at the end of this week. Seriously do not expect to learn anything!

All the best have fun, paint figures and keep warm. Right I had better upholster that sofa that I have been putting off. All the best Clint.


Friday, 27 February 2015

2 More Platoons.+

Well continuing with the 15mm US Paras here are 2 more platoons.

Firstly the MG platoon. in this platoon we have 4 .30 cal machine guns a command stand, a Garand rifle stand and as usual for me a bazooka stand. While you can have too many bazookas I have not as yet reached saturation point. I will know I have when my opponent fails to take any armoured vehicles and that has only ever happened in one game! All the figures in this platoon are Peter Pig except for the Command and rifle stands.

As with models shown previously they also have the US flag patch on their arms but no regimental flash, allowing me to use them as the 82 or 101 regiment should I choose.  I have given them orange tufts as in PBI these will count as medium machine guns and not light machine guns. As opposed to the red tufts I have given them in rifle platoons shown last time. As these guys are lying down I felt they were in more of a prepared position so the change of tuft colour made sense to me.They use the same .30 cal machine guns as the second platoon but as these are lying down.  It is a just a peculiarity in the rules and besides I did want a machine gun platoon so please forgive me that small peccadillo.

Next we have a Stove Pipe platoon. In the old rules Mortars were quite deadly as they effected everything in the same square which meant I would try to use them as often as I could. Yeah I am like that. But I know they have changed the rules and it will be interesting to see these in action under the new rules.  So we have 3 medium  mortars, command stand Bazooka stand (you are not surprised by that) and a Garand rifle stand to represent some troops carrying ammunition for the mortars.

The Bazooka stand might discourage armoured attention, but probably not so I think I had best keep something close by these to deter any German big cats. It is also hoped that the rifle and command stands might stop the stove pipes from being assaulted if they get to close to the Germans. But the idea is not to get them close!

I will no doubt have to add or subtract a stand or two as the points dictate so when it comes to a battle the platoon organisation throughout the force is likely to change.


Finally for today. Yes I can see another 2 posts for this company so I hope you are not bored just yet. I have included a single sniper crawling through the reeds. As with all the Mortar platoon this is a battlefront miniature, I had 3 in the boxed company set. But think I only need 1 in the new rules. So I may well do another just in case.

Next time I will show 2 support sections. And the time out My Engineer Platoon which has not yet been on the Analogue Painting challenge so I am forbidden from showing it until it has been for at least 24 hours. And as It will go on the challenge on Monday you may have to wait a very short while for that. But as it is not greatly exciting I am sure you can wait.

That's it for today, thanks for looking have a good day or two and see you again soon I hope.

Kind regards Clint

Wednesday, 25 February 2015

US Paras, 15mm PBI

For the painting challenge and because Peter Pig have bought out version 3 of PBI. I have done some 15mm WW2 Us Paras. I have never mentioned which regiment these are from but I have called them dog company. All the names are made up and I will probably repaint the names if the stand of figures dies in a game.

So starting with Captain Brown the leader of Dog company. You will note the white rank marking on the back of the helmet and along with every other figure the US flag on the Right arm. Not an actual US Flag I may be quite a good painter but there is no way I will paint all the 13 stripes and all the 50 stars on a figure this small. Sorry that is just not going to happen but what I have managed on 15mm figures is close enough for me!


The Ist Platoon is commanded (in my world) by Lt Cole. Consisting of 10 stands in all. A command stand a Bazooka stand (Directly behind the command stand|) 1 smg stand, 3 Lmg (BAR) stands and 4 Garand Rifle stands. Originally they did not issure Browning Automatic Rifles (BAR) to paratroopers thinking at 48 inches it was too long a weapon for them. Each of the Bar stands has a yellow tuft on the base to clearly identify them on the table top. After all I might need all the fire power I can get, you never know it might make a difference.

 2nd Platoon Currently Under Lt Powell, but likely to change to Lt Spiers (Thanks Dave Docherty you scoundrel), is not equipped with BARs but with .30 Cal Light Machine guns. These have a higher rate of fire and need more ammunition! They are designated with red  tufts. Again so when on the table top I am able to see where they are and then attempt to use them appropriately. Despite the Battlefront miniatures showing a tripod with these figures again originally a bi pod was used for Paratroopers. As wargamers we can easily quibble over such things but as in the rules they are all treated as LMGs is there much point arguing
about it? So moving on.

3rd Platoon is of a similar make up to the first 2 platoons but this time with BARs instead of  .30's. So back to the yellow tufts. As with the other two Bazooka antitank is included in the platoon and a stand of SMGs. By keeping Bazookas in every platoon I hope to give them enough integrated anti-tank weapons that they can keep the Germans at bay. Or at least make any German tanks weary of getting too close. Well that's the idea anyway. It may now work at all.

In the next few weeks I will add extra stands to swap out the SMGs for Garand's if need be. I am not sure if it will be better in the game but it should provide all the options I need.

I will be splitting this post over several days as I am still beavering away at the Engineer platoon so I will expect to show that by this time next week.

In the Challenge I have received much high praise for my basing so if you can let me know if you would like to see a basing walk-through and I will try to do one in a couple of weeks.

Well that's part 1 done, parts 2 and 3 to follow later on. But this is the bulk of the fighting troops. Which is not to say the others don't fight just that these are in most cases the front line troops.

Thanks for looking I will post again soon all the best Clint.


Monday, 23 February 2015

Cavalier 2015

Cavalier is a good show. It is the first show of the year for me and packed full of enjoyment. Normally.  I think I must have been having an Off day. I did not enjoy it hugely. Enough to go back but not so much that I will cry if I do not!

There are very few stand out games and here they are!


 Firstly a zombie game by East Street Games which they plan to release in the spring. The figures will start flowing  at the Salute show and each survivor will get a zombified version as well so when they turn muhahahahaha! You get the idea.  Quite an open cityscape with a few randomly placed tyre barricades sure.  But it was a zombie participation game so I will forgive them that. But No you could not play the zombies they had a ref who did that part. Yeah I know spoilsport!
Next up is a game by Southend wargames club. A 10mm ACW game using a mixture of figures from various manufacturers and looking the nuts as far as I was concerned.
 Nice figures and a terrain mat embellished with fences and hedges and  woods and trees. For me it was clearly the best looking game there.
 
 Some Wild west Malarkey from the North London group. I know wild west games always look great and this is no exception and would be an excellent club game but for me on the day it left me a little meh! I feel sorry for saying that as it was easily one of the best games there maybe I am wild wested out at present. I think it is all the mdf wild west buildings that make it so for me now. It just seems to be let's throw some money at it and it will look good. Whereas time, imagination and effort will always look better to me.

What on earth is going on below? Well clearly this is a James Bond skiing game. Maidstone wargames club really do put on some very good looking games. This one did not spark my interest though. But it was interesting as it did add a 3rd dimension which many if not all games seem to miss.  There are so many "Flat" games at shows it is a joy to see something different. Again this would make a great club game to waste an afternoon with but I feel sure I will get bored of it at the next show I manage to get to. But at least they are showing something different which to my jaded tastes is always good.
 
Overall I would give the show 6/10. worth a visit but with traders and numbers down it did seem to have lost a lot of atmosphere this year. (Normally I would give it 8/10) I know I am in a hyper critical mood but I did come away with some good buys (See previous post) and I am only showing games I like and not the other 12 or so that were there. But many of the other games just seemed bland club type games that I have seen dozens of times before. So I must endeavour to make any game I put on MORE than just blah! I will try to use this to do something better than the average club game. So from that point of view inspiring and inspirational. But the games on show mostly were not. (with exceptions noted above).
 
It was a good day, and meeting the other bloggers was nice. In fact for me that was the best part. So if you were there and we talked thank you for making my day.
 
 
All the best Clint.


Sunday, 22 February 2015

Cavalier Swag!

The time id 4:15 and I have just got back from the Wargames show in Tonbridge. "Cavalier"

So having just munched a cheese sandwich the only thing I have eaten since 7am I will now go through my list of special and very needed prizes from the day. Starting from the left and working down fro the top.

4 Bags of figures WW1 Aircraft.

1 Pack of static grass as I had run out..... the first time ever!

1 Pack of Artizan Sky Pirates..... don't ask, they were an impulse buy!

3 Packs of 10mm Samurai...... Only 2 shown, but the price was right so I snaffled them up.

1 Zveda Sdkfz 222 (I did want 2 but 1 will do for now)

2 Packs of Peter Pig WW2 US Paras. (OK that's 1 pack of DEAD paras and one pack of US Marines with flamethrowers.....Best if you don't ask!)

3 (Back to the top again) packs of 2mm round MDF bases

3 Foundry tubs of paint (Bargain they cost a pound each)

4 Packs of EMP miniatures. Not a company I had heard of but one I will be getting more stuff from. Trust me they are figures best not thought about. (I will get more at Salute though).

Well that's my loot list I will do a show report in a day or so and YES there was a zombie game.

Thanks for looking feel free to comment or not as the mood takes you,
all the best Clint

Friday, 20 February 2015

Hooker and Mc Cellan

General McCellan
Continuing the ACW figures for Matt I have finished 2 command stands. Bother are Union Generals. General Hooker and General Mc Cellan. I may have miss spelt them but you will get the idea.

They may well represent both me and Matt in the Club campaign. Neither of these generals was considered very good but that said they are definitely better than me!


General Hooker
The figures are a mixture of Peter Pig and Frei Korp aand as well as the general and flag bearer they also have an aide de camp on the 40mm by 40mm base.

Talking of bases these are clearly not in my normal style as they have been created to fit in with Matts Union Army, just like the Berdan's sharpshooters I showed a couple of days back.

Well that's it for today. I am currently working on a big submission for the analogue painting challenge. In addition I will be going to my first show of the year on Sunday. Yes of course I will take a camera (and spare batteries) so expect either a loot haul or some show pictures on Monday. Talking of loot I have no huge plans and really not much in the way of a shopping list so I am not expecting to get very much (Famous last words).

So until then take care have fun and paint some figures.

Cheers Clint


Wednesday, 18 February 2015

Opps!

Yes I admit it, I have neglected my blog recently. Part of it is the schedule for the analogue painting challenge which means I am only allowed to post once day a week for the challenge. But most of it is me being lazy. So I am giving myself a talking to and getting it sorted out.

Berdan's Sharpshooters!

Correct I have been painting some ACW figures for my friend Matt. So today and maybe to change our luck in the ACW campaign at the club we have a new unit.

Based for the Peter Pig rules of "Civil War Battles" on 30mm square bases there are 8 full stands. And 1 half stand (15mmx30mm). For a total of 26 15mm infantry from "Blue Moon". I have tried to emulate Matts basing style and not my own as a single look to an army is better than having everything on different bases and looking like a patchwork quilt. So the bases should fit in quite well with what he already has. I will admit I did chicken out and did not put the yellow bugle badge on the top of the kepi. That was just too fiddly for me, If I was to do them again I may attempt a simple yellow splodge but I may keep them clear of that. As trying to do it accurately and without a transfer I would personally in the "Too hard" basket. Yeah maybe that makes me a wimp but until I see anyone do better I just don't care.

Since painting these I have found out that they are well known amongst Re-enactors who all seem to want to be just that little bit different. I find that attitude very understandable as like wargamers they are in a niche hobby so to some extent value their identity and thus a "cookie cutter" unit with strikingly similar uniforms may really not be for them.

This picture swiped from the internet shows what the unit looks like when portrayed by re-enactors. Being blunt they probably have more interest in the look of the uniform than "Joe Average" wargamer.

Looking at their uniform it looks like mine are a little on the dark side but that is not a huge problem as the green will stand out on the tabletop where everything else is either blue or grey.

The Above mentioned "Civil War Battles" do require casualty markers. So these are a few by Peter Pig. Again painted in the green of the unit just for completeness.

Thanks for looking today I will strive to be more regular over the next few weeks.

All the best to you and your family.
Cheers Clint