Showing posts with label Model Terrain. Show all posts

Tuesday, 23 April 2019

Gasbag (zepelin 2)

Yes I know my work bench needs a tidy.
It takes a while and it goes a long time through what I call "The NASTY stage". By that I mean a time of construction where you think it will not get better and it is worth scrapping it! BUT rest assured I shall continue.

At present I am only working on the gas bag. Yes it is not historically accurate. It is a model for wargames and not for a museum. So Who cares?

the basic shape
At this stage I have given it 3 layers of paint/glue and tissue to build up the skin. It is too big to paint in one go for It has to be done in layers.  At present I am repainting with a mixture of paint an glue not settled on a colour just yet but I am hoping/planning a dirty beige!

All I care about at this stage is the look and while I realise a 3 year old would destroy it in second I am hopeful (but only just) that it will be strong enough for wargamers.  I plan for it to have 2 or preferably 3 more coats of paint and glue. By which time it may be strong enough. Which of course mean not even close to strong enough.

Rear end (so far)
The read is always awkward. And being as it has 5 lumps maybe doubly so. Fins, rudder and ailerons need to be added at the next stage and will be discussed then. So at this stage not really to much more to say mostly it is do 15 mins work and return the following day. With luck I should have more to talk about next Zeppelin update.

Until then paint  and blog if you can and I shall get more out next time..

All the best Clint


Friday, 19 April 2019

Pulp Zepplin (1)

Additional Stretch goals
I had a sleepless night last night. (Not though choice I hasten to add!) As such I did some thinking. (Yes it  did hurt and I am sick of listening to the worlds smallest violin before you ask!) Anyway Long story short. I had an email from Karl at Crooked Dice to let me know that my Kickstarter should be ready to ship in a week or 2. As all the stretch goals are now finished and delivered to his home.
Starting Point

Anyway as I wanted to build a "PULP" board any way I decided to start. And what is more Pulp than an Airship!?  What a Zeppelin? Who in their right mind build a Zeppelin? The answer is NO ONE! But I thought it was worth a try anyway! I decided it would not be all that large, So swigging down the Pepsi I figured 2 2 litre bottles would make a good enough "hull" (I am sure that HULL is the wrong word but until I think of it HULL will do!)


 Needed a nose of some description. So I simply cut a pimg pong ball in half! I am sure there is a better option but I just went with what I had! As with the hull I am sure there is a MUCH better option but I could not wait for that. I NEEDED to crack on!


So using some UHU general addehisive I stuck 2 Pepsi bottles together.  At this stage I have no idea if it will work but am hopeful! It is now about 3 foot long. Judging that to be sufficient I stopped there. At this stage it is all pretty rough but with scissors glue a scalpel and a saw I am not overwhelmed! (That comes tomorrow!).

This afternoon allowing PLENTY of time to dry I shall give it a skin. I ran to the local store (A tescos as it happens) and bought some cheap Kitchen towel. So I will detail my endevours later on maybe Sunday.

Now while I wait for this afternoon to arrive and me to get a little more spare time I have some questions about Zeppelins. I promise not hard ones.

Firstly the engines and bomb rack will be external to the gondola! But what else would you like to see in the gondola.  I shall put a cockpit and Matt has suggested some machineguns. But what else is needed bearing in mind it shall be quite small? Please add serious ideas to the comments and I will see what I can manage!

COLD WAR WARGAMING.
As mentioned last time I plan some cold war wargaming. With a bit of tidying up I have a modular desert board. So it makes sense to me to work in a middle east setting. I shall say no more until I get the basics done. But remember you heard it here first! Or forget all about it if you choose.

Sunday, 10 March 2019

AZTEC FARM

A scratch built 15mm sci fi farm. No this is not a farm for growing Aztecs! Nor is a farm built by the ancient Aztecs. It is just the name I was using as I built this.  Nor is it complete. as it would require several further tunnels to finish it. But it will do for now!
Below is a step by step guide on how it was made.

Firstly I needed a concept. It needed to be easily built and cheaply. So I used only Items I could either scrounge or had already I am sure there are beter options and I look forward to seeing them.

This was actually the hardest part. Using "Grey board" (extra thick cardboard) I cut out some semi circles. I cut them the wrong size. Feel free to laugh andI am sure many of you will. This is actually quite gruelling and requires some effort. So Rather than re cut them to the right size I went with it. Not Ideal but what in wargaming or I life is!

I used  some spare 6mm MDF to make a base board. This was easy and straight forward and I was able to use power tools so little effort bu some time was required. For the actual tunnel I decided on an old "Pepsi" bottle. Feel free to use something else. I nearly used "7UP" as the bottled were lime green in colour and I thought (and still do) that might make them more sci fi in appearance. But I had a pepsi bottle so that was pressed into service.
There are molding lines and I used these as a guide to get some pieces hemispherical and using the molding lines was accurate enough.

I did a dry assembly first and then once I was "Happy" (BTW I am never happy) first stick the end pieces in place and then set about making the interior. The interior was first painted then dry-brushed and then commercial "Tufts" were added to reflect crops.  Again |I used what I had and the next version will probably be cheaper! Yeah I am a skin flint!


When ready (and left over night) I used a cheap (Bought from the 99p store) Uhu glue To hold in all in place. It is not perfect but did the job I required cheaply and efficiently.The interior was painted black on the walls and any other colour would have been acceptable, Personal choice and what, in this instance, I had to hand. Thick card board (actually Mounting board) was used on the sides. Again UHU was used but feel free to use any other general glue.


At this stage all the inside was done and a coat of grey paint was applied to the appropriate areas. As I had not been super neat (such s my way) I used thin strips of "Plasticard" as a junction between the "clear"  and the grey walls. Yes I split glue more than a few time and If working commercially would have taken more care. Superglue was used to hold the plasicard in placeas my "Mekpak" had all dried up and superglue was all I had handy! Again more care should have been taken but it was not and I have learnt not to beat-my-self-up about it.

Finally I painted to finish ad blogged it. I added a solar panel from the "Blotz" company (LINK) and a figure for scale. The solar panel and the figure are separate and can (and will) be used for other things!

Yes lots to get "right" in the future, but at least my sc fi 15mm people shall not starve straight away.  Yes I need to build a few more (and in different sizes) or supporting life will not be easy and shall be expensive. But not a bad place to start.

Below are some more finished pics just do you an see all the mistakes. Don't bother pointing them out I am already aware of them and all it does is make you look stupid!


Thanks for looking and no doubt see you soon. All the best Clint


Friday, 2 November 2018

Cactus (28mm WTW)

Yes I felt the urge to do some wild west wargaming. It has now quickly past. But while I was in the mood I did manage to paint (roughly) a Wargames Terrain Workshop (WTW LINK) 28mm Cactus. Personally I like the sculpt, very well cast and clean and easy to paint. Just what I want from a Cactus. I am sure it will fit well into a wold west setting with NO difficulty!

It cost just £3 and was a joy to paint. Model wise, very well cast with no flash and no Moulding lines. So a real minimum of clean up. So really just a prime and paint.

I am tempted to get a few more but as wild west is currently not my thing I will hold off a while longer. But be aware when Wild West Wargaming does rear it's head with me again I shall nip out and buy some more.

I was going to grit the base but a simple paint was all that was required. We did not want to guild the lily to much so I have kept it simple. The taller cactus clup (I am sure there is a better word but at present it escapes me0, is tall and wide enough  for a 28mm cowboy to hide behind. While the rest are either waist or chest height.  Overall I am very pleased with the cactus and while at present Dave only makes (I think) 1 variety of these if there was more I should get one of each!  No that is not a cue to make more. As previously mentioned I am not in a wild west sort of mood.


That's it for today, back to painting some 28mm Colonials for Matt, which I hope to show soon.

Thank for looking more again soon. All the best Clint.

Friday, 21 September 2018

The Moon's a Diarylea carton (Part 2)..... and relax

Well as you may remember just 5-6 days ago I posted (Part 1) and this is part 2 the final part. Well at least final for now.

Most of the rest is repetitive to do and needs to be left alone overnight. Perhaps longer if you applied the sand paint and glue mixture to thickly. THEREFORE do it somewhere it will not et disturbed, that is dry and no one  else wants to use and NO ONE minds if it gets dirty. IT WILL>

You will need 3 or preferably 4 (or more ) coats. It all depends on how much repair you are willing to do and how roughly they are to be treated.

Mix up the paint, glue and a small drop of water. You will know how much water with experience, and the only way to get experience is to do it! As a staring place I would suggest a LITTLE water. As it is just to thin the paint and the glue. I Try to use about 1 part water to 6-8 parts paint, it all depends on how much glue is already in the mix.

Paint the boards with this mixture. And then using a sieve sprinkle sand on the boards, making sure to cover all of the boards with first the paint/glue mixture and then again with the sand.
DO NOT try to brush the sand off!
Wait overnight (at least 25 hours preferred). For some people (Author looks sheepish) this is the hardest part

Repeat as mentioned above a MINIMUM of 3 times. (each time does make it stronger, BUT you do lose a little definition. So Plan on it taking 4 days  MINIMYM.


Remove excess sand at each coat. I find simply tipping it works very well. Repeat the tipping on all sides to make sure you have all the excess sand off before starting the next coat.

Keep the sand safe and use again on later coats.

If it is clumpy It has not had long enough to dry. Which means It has had too much water in the mix! If it is clumpy leave it alone for 2 more days (Perhaps longer is the weather is wet>.

While each step only takes 30 minutes or so, but drying time is MUCH longer.

When you are satisfied (remember a minimum of 3 coats and ample drying time). Paint it with emulsion paint your base colour. feel free to water the emulsion down a LITTLE as it then gives better coverage. If you water it down to much it will need 2 or perhaps more coats. (But usually not)
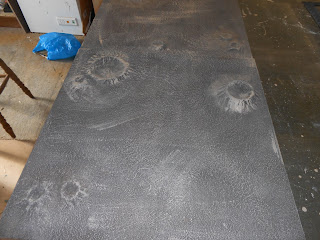
Leave it to dry (Again) overnight.

The final stage is to dry brush the op colours on. I use a 3"  or 4" brush for speed Bought in a pack from Poundland.

You will need to work up through the layers until you get to the highlight coat. So while you do TRY to keep brush marks out it is not a complete disaster if some occasionally show in the early stages.

Later coats will make any brush strokes less visible. feel free to work the colour into each and every contour. The boards if done properly should at this stage be strong enough, unless you are very heavy handed or super strong and determined.  But if you are maybe making terrain is not for you.

This stage should not take long if you have all the preparation done. If you start to early the sand will clump and you will struggle to get a good result. But I honestly finished the painting of both boards at this stage within 30 minutes. Preparation is the key and waiting for it to dry properly is VITAL.

DESIGN: When I made my first boards I had too many craters. So be aware of that. These boards have far fewer and are designed to allow other terrain features to be added later.

I decided on some open areas for 2 reasons. Firstly I did need some additional terrain , such as buildings (I will start a Farm in a week or 2), 2 because not every inch of the moon has been hit by a meteor, 3) some open spaces make a better game I have found.  (too much cover leads to a certain type of game and too little cover also leads to a certain type of game.

Finally:These 2 boards bring my moonscape (as I call it) up to an area of 6 foot by 4 foot. And if need be I could make it MUCH larger, limited only by time, storage and money. Ido not at this stage need a larger area so 6x4' is where (at least for now) I will stop.

Thanks for looking. All the best Clint


Saturday, 15 September 2018

The moon's a dairylea carton! (Pat 1)

Starting place
Well sort of but it's also loo or kitchen roll tubes as well as several other things When It comes to making terrain I will use anything. The limits are what does it cost, will it work, and what will it look like!

I wanted to make some more "Moon" boards for 15mm sci fi. (well any scale sci fi really!)  That being the case I  have started! Long time followers will no doubt recall the process.

Here is a quick walk through of how it is made.

Firstly you  need a board of the right size. My other boards are 2'x4' so these will be 2'x2' It will offer a great deal od variety that way.

Starting the Craters
 Craters are the most time consuming of all  the processes. Firstly take a tube and cit it down to the right height. No one can tell you what the right height is you will have to judge it for yourself. But as a word of warning LOWER is better! so 1=2 cm for a roll of masking tape size tube!

Next build up SEVERAL(3-4) layers of tape.  These will go from the inside to the outside. They need to be firmly "squished"  down in the centre and at he edges. They also need to leave a hollow triangle section which make up the slopes of the crater. Just look at the picture and see what I mean. Right you understand now! (I hope)
Keep going it takes a while!

It takes much longer than you think and you will use up LOADS of masking tape. Luckily "Poundland" currently has 4 rolls for £1. So if there is one local get it there. I use masking tape you 2 reasons. Firstly the Cost. It's cheap. Secondly it has a mat textured back and that makes it easier to attaché the sand to! Feel free to use something else and if It works better let me know. Currently I know Masking tape works and it's cheap and that is why I use it.
Do all the craters


It's common sense but do all the craters at one time. Yes it is boring and time consuming but I know this way works and I also know that other than the wood (which does cost a bit) works out cheaply. It really does, materials costs were less than £1 for 2 boards each measuring 2' x2'. And lets be honest that is less than a pot of paint!


add the sand texture!
This is the messy part. DO NOT DO THIS INDOORS. Mixing up a LITTLE water White PVA glue (Actually called Resin W by people who know) A coloured water based paint (either acrylic or Poster or Emulsion) I use all three at different times (NOT TOGETHER). And Brush it on the boards. Now I use the cheapest brushes I can get (5 for £1, from "Poundland") and at that price it is easy enough not to care about them. before the Paint mixture with the PVA is even nearly dry I sprinkle (via a sieve) builders and on the board. I use Builders sand because it is cheapest and one you have a bag that will last you years.

That is he process. It is not hard at all but does require some patience, practice and hardest of all some common sense!

Part 2 to follow later this week,as It takes some time to do it! And I have yet to get as far as a finished board this time out. I plan on showing it NEXT weekend! (that shall encourage me to get of my fat lazy bum and get some terrain done!)

Off to a small local show tomorrow so a show report and loot on Monday. Until then, take care and paint something!

Wednesday, 25 July 2018

Progress is progress

Yes first off some more BRIGADE MODELS (LINK) 6mm sci fi. This time the Shaman Medium tank! 6 of the things all ready based and varnished and shall be puit in their box by the time you read this! Not the biggest amount of painting but it needed to be done. And yes there is more still to come, and NO a group shot is not planned for a while.

The Shaman tank is a good all around tank but nothing so special that causes too much worry on the battlefield. It is in no way a bad tank but it does not have too many exceptional features. Competent and with a good crew deadly just not exceptional at any one thing.


 Work continues on the castle . The basics of the gate way are now done and the walk way parapet is about 1/2 done. So progress is slow but at least visible. My plans for the next few days are to get a set of stairs built to take models from the ground (Courtyard) to Parapet level. And that should be in the next update. (Fingers crossed).

That's it for today as It is planned to be another scorcher and I need to get things done before I suffer heat stroke!

Until next time, take care have fun and if  possible stay cool!

Thursday, 19 July 2018

2 steps back wards

Well that is what it feels like. It really does.

That aside. I have been working on my 6mm (1/300th scale) Cold war stuff. I know It does not amount to much, but here they are.

They are Heroics and Ros (LINK) miniatures of BTR 60's . While not a front line cutting edge APC in 1985 they were still used and I for one have always liked them. This is enough for a company of Infantry transport. Perfect for a Nava regiment or for very front line troops of a satellite country. So Perfect for me should I do an invasion of Turkey! (Which I have mentioned before).

You have 3 platoons each of 3 vehicles and a HQ Platoon of 2 vehicles. (One command vehicle and 1 security vehicle from memory).

Easy to paint and get finished which is why I am showing them today.

As I wait for the post to deliver at least 2 parcels I have started a terrain project. I hope to have more to show on Saturday. If the parcels arrive and if I get more done I will show then. But for now just realise that not everything is new, sometimes I take old projects and revamp them and this is a case in point! Do not guess what it will be as I assure you all shall be clear in days yet to come and I zoom out and don't crop the photograph.


Until such times keep plugging away and get what wargames stuff done as you can. And rest assured that I am as well, but not always in the foreground!

All the best Clint

Monday, 9 July 2018

Sorry no painting!

Well you Know it has been hot! For me far to hot. I sit in the same place to paint and I drip! OK I have started some figures for Matt. So expect some Burpas by the end of the week.

Change of Subject 1

Yesterday at the club we gave "What a tanker" another game. They decided I was not to have a tank destroyer this time. (thanks Richard). They also for a change decided Russian front.  I started in a German Tank lasted a turn and a half and was shot and no save and as we had unequal numbers I was then started in a T26. The lowest level Russian tank possible. I think they may have regretted it 3 kills later.

Here are my Tank Crews

British A13                                 1 Kill
            A13 (Second vehicle)     1 Kill    

Russian T26 B                            3 Kills         

German Panzer 2 A-C                Dead
              Panzer 35t                     Dead
              Panzerjager 1                4 Kills

So I can always have at least 1 tank with at least 1 kill in future games OF THE SAME TIME PERIOD. Not boasting but few other players at the club have gotten more than a single kill in a game. So at present I have a target painted on me and ALL players are trying to get me to some extent.  I bet they get me soon and with much celebration.


Change of Subject 2

Due to ease of building I will be going for option B, the Hidden Valley for the "Pulp Alley" game board. But I also plan to float an airship over the board to emphasis the height! At this stage DINOSAURS will be at a minimum. (Sorry Michael) but this will allow me anything from Victorian explorers all the way back to Cro-Magnum man and everything in between. SoTim shall be allowed Aztecs and Matt shall be allowed British Royal Navy! And Kev can (if he chooses) have Undead Egyptians!

Who knows what everyone will pick!

That's it for now too hot to sit in the sun typing!

All the best Clnt


Sunday, 1 July 2018

An easy paint

More talking than anything else today. I admit it I got side-tracked into real life. Maybe for a good thing maybe for a bad one! Who knows at this stage!

Here  are probably the easiest things I have ever painted. 2 Elephant tusks, or Mammoth tusks or if you choose really large alien teeth!

They are by Wargames Terrain Workshop WTW (Link) Thanks Dave. I really do like them simple and effective and can be used for almost all 28mm wargames. Maybe they were just loot or maybe they are objective markers of in my Back of Beyond just really large Mammoth tusks. Who knows at this stage.

I am continuing to paint 6mm sci fi vehicles but the seem to be going very slow at the moment, perhaps due to lack of sleep in the heat. But at least they are coming along and I shall have some to show next week. Until then a sneak peek into my mind...... AHHHHHH! Yeah I thought that would be both scary and unpleasant.

Subject changed:

Next year, I know it sneaks up fast! Anyway next year at some local shows I plan to run some "PULP ALLEY" games. At this stage I have 2 plans and here they are!
Option 1;
A Victorian Science fiction game set in a Victorian steam-punk dockyard.  Above is a Picture of Chatham Dockyard so you get an idea of what kind of feel I would be looking for,

here are my initial thumbnail sketches.

 At this stage all is likely to change IF I go down this route. So only take the layout as a rough guide and do not try to find the exact option.

All buildings would and should be enterable and as such all should have fully functioning interiors Which means in warehouses piles of crates,sacks and the like for loads of cover.

You will no doubt note,  as one of my players did the airship and the submarine. These ideas were seized upon and to those members of tHe club became for a very short while the most important parts. Where as I looked upon them as being added extras, there to be finished last so if they were not finished they would not matter.

I already have the figures and am happy to get a few more. So figure choice would not be an big issue.


Option 2:


The idea of a secret valley. Harder I found to sketch! I am deliberately not saying if \I would choose to make an Ice age  Crevice, an African rift or a South American canyon. If this is selected I hope to make that decision with the aid of club members. I do like the idea of an airship somehow being involved for 19th and 20th Century Pulp adventures, as well as a possible Tarzan type character.

As such I have all the figures OR am willing to buy a few more.  Again no reason why in a pulp setting German or Royal Navy could not be involved. Just think of "Doug Mc Clure" films and I am sure you will get the idea. Although at this stage I shall not be going full "Valley of Gwangi!" Unless players really want me to.  I am sure we all remember the T-Rex in Tomb rader though! Still brings a smile to my face


ANYWAY:
if  you have a strong preference let me know. I shall of course pay a lot more attention to my club members as they will have to play it.  Maybe try a few other clubs as well before a show. All depends on how soon I pull my finger out and get on with it!

If neither of those ideas appeal I am happy to listen (BUT it shall be "PULP ALLEY" ) to alternatives. I have learnt in the past though that the more options given the less decisions are made and the more debate is had usually by the people willing to do the least work and try to claim the most credit! So please stick to the above ideas unless you  have a really smashing, bursting to get out never been seen at a show before idea!