Saturday, 13 June 2015

Rusty Regiment part 3

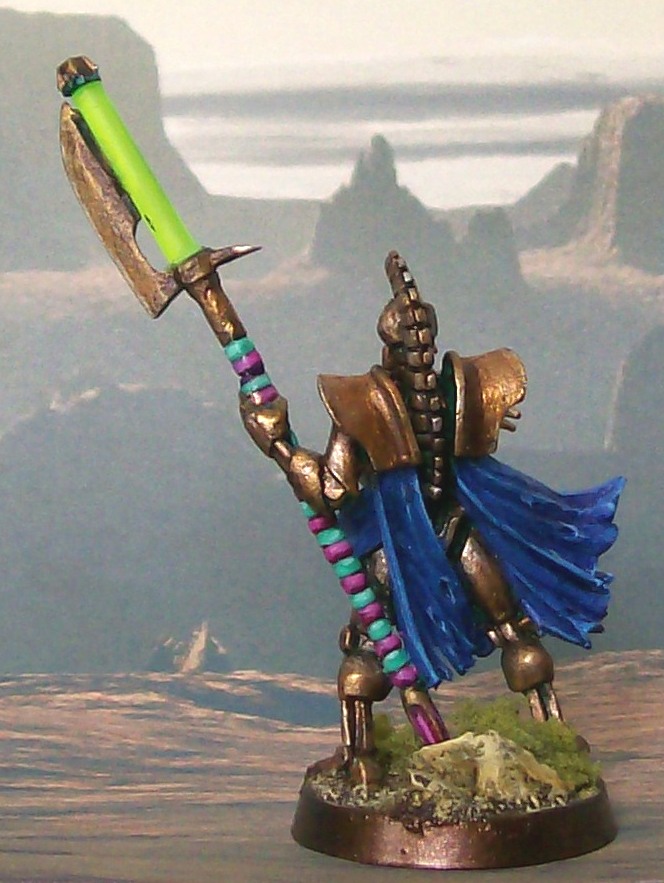
Yes there will be more to come, and yes I know this figure is not very rusty. In Fact not rusty at all. The reason for the lack of rust on this one is very simple. This is a Necron Lord. As we all know nobility does not get covered in brown smelly stuff, be that rust or something more organic. So this was not a very lengthy paint job, just a simple change of colour from silver to gold (well gold-ish). As we all know gold does not rust so I have not added any rust effect paint anywhere on the model. There was a slight repair, just drilled and pinned in one place denoted by the different coloured section on the staff of light. (Just above his hand as I know you will want to look for it and why should I make it hard for you. )

I have tried at least in my head to use a colour palate close to how I would imagine ancient Egyptians might use, but deliberately staying away from actually looking at the colours they did actually use.  That is the kind of crazy mixed up way I think as I did not want to make exact copies of ancient Egypt. I used ancient Egypt as the codex has lots of ancient Egyptian names often ending in KH. Which while they may not be authentic names does give them a hint towards ancient Egypt. I have not named my "Dynasty" so far but I am sure I will before the first game.

Tomorrow I will be one of the very few of the Rainham wargames club (3 of us I think) putting on a game at the Broadside show. All the terrain and figures and rules and knowledge this year is down to Tim so I can take no credit for any of it. But if you want to come and say hallo you will be more than welcome, BUT I must warn you that this time I am not bringing any home made fudge. NONE at all.

While at the show I do have a VERY small shopping list:
  • 1 pack of Redoubt figures for the French Indian wars
  • 2 Pots of paint, (I always NEED paint)
  • Maybe a platoon or a squad of 20mm WW2 Japanese for "Chain of Command"
Like I said a very small list, so I wonder what I might actually buy!

Thanks for looking today, maybe a swag post tomorrow night or on Monday IF I buy anything exciting. If not I hope to do a show report early next week.

Thanks for looking today, all the best to you and yours from Clint.

Thursday, 11 June 2015

The Rusty Regiment (Part 2)

I know some of you will be turning away in disgust! I must admit if it was on some other blog I might well do the same such is my dislike of GW. However my love of my nephew is stronger. So to that end here are the latest batch of Necrons. Right that's the mushy stuff over with.

Necrons as I am sure most of you will know are the GW scifi Undead of the 40k universe and actually very nice models. Personally I MUCH prefer the older Necrons and not the new fancy stuff in the hardback codex. Of late it seems to have become more vehicle orientated, but not in a good way. So I will be sticking pretty much to the older models except Pariahs as they are not in the new codex!

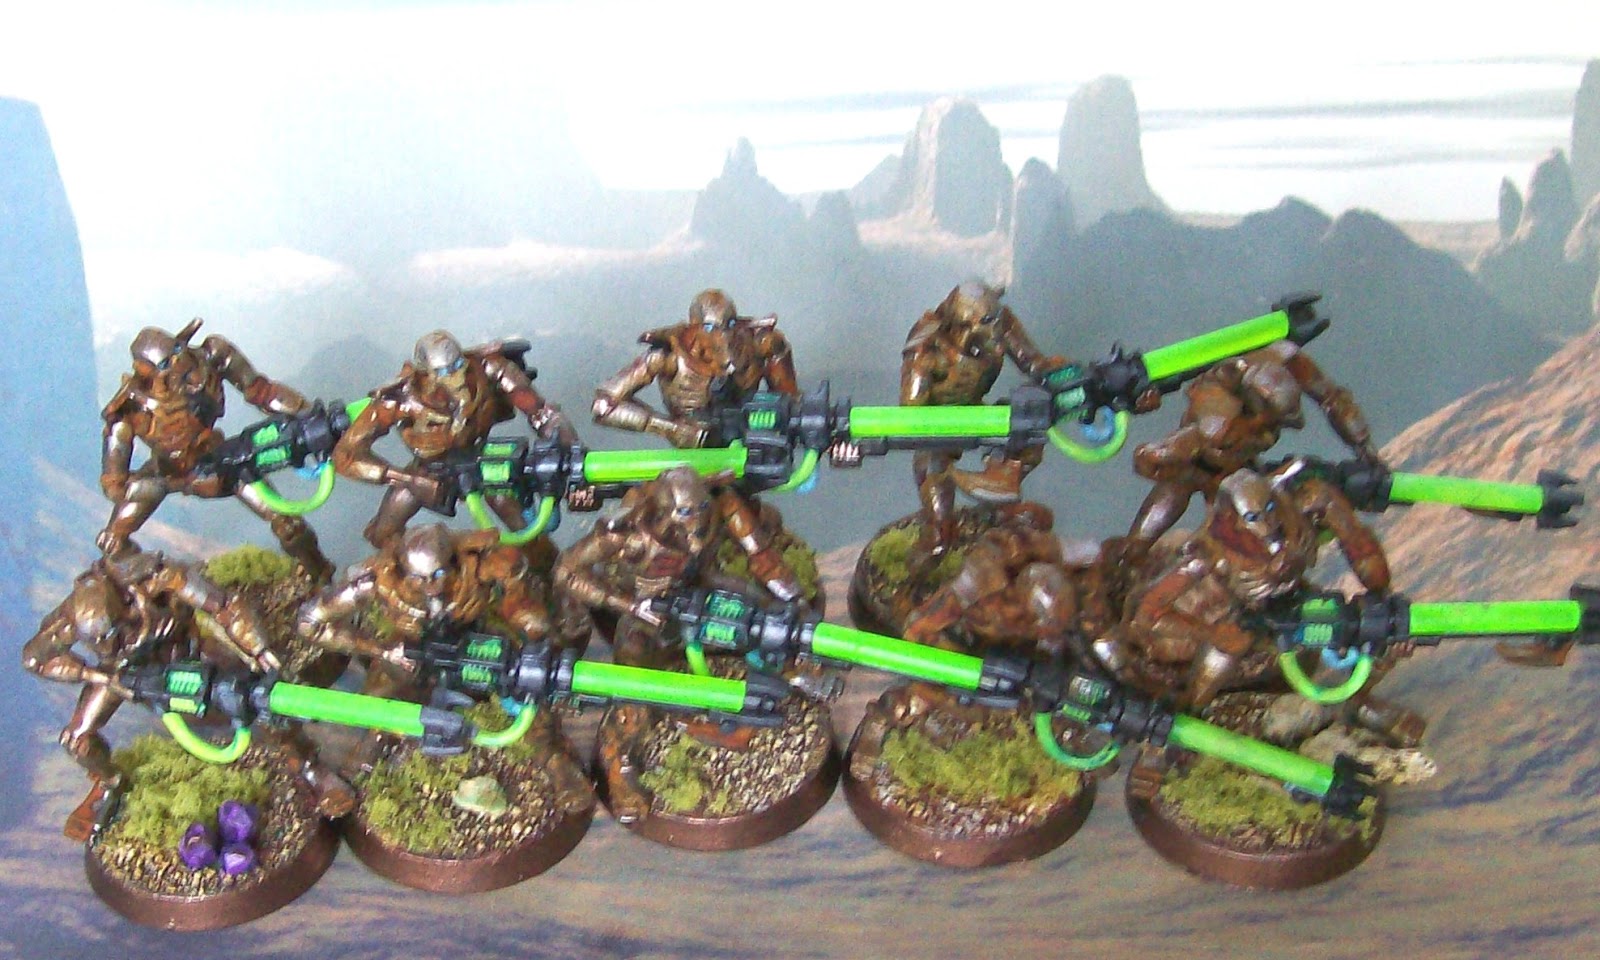
So Today just 10 rank and file Necron Warriors. This is the third time that I have painted these figures and I suspect the last, (Crosses fingers).  As you can see I am using liberal amounts of the rust paint to give the decayed left on an abandoned world for a million years look which I really like. Did the Romans think that the future would be all polished marble and clean streets? Well if they did they were wrong, at least where I live. So we have a dirty grimy shabby decaying future. And in my 40k Universe rusty necrons. In your 40k universe they might all be shiny and bright and there is nothing wrong with that either, Just each to their own.

The Crystals on a few of the bases (the purple bits), are made from model sprue just whittled into shape and paint slapped on. They take a while probably because I don't like doing them. But I do like the result so they will appear on every 4th base or so.

My posting schedule is a bit mucked up at present. But I will do another blog post before Sunday and the Broadside wargames show. Just a pre-show shopping list and believe me it is not expected to be a very big list at all.

So until then, take care have fun and enjoy the weather no matter is wet or dry as there is nothing us mere mortals can do to change it, only the way we think about it.

Cheers Clint

Sunday, 7 June 2015

Dispatch rider and 2 officers.

Well these are the last figures I need to get done for Matt. (at least until next weekend, maybe longer). The figure on the left I am told is from Empress miniatures while the centre and right are Great War Miniatures. They  are again for my chum Matt and they are destined to be used for both VBCW and WW1.

 Unlike the previous officers these have no arm bands but the enlisted man on the motorcycle does. As you can see he has the white over blue armband of the Royal Corp of Signals as befits the Dispatch riders in the first world war. The motorcycle is rather slim as it does not have the massive petrol tank that you se on them today, but rather a far more manageable size tank. Exactly as they were in this time period as one was not expected to travel 100 miles or more at a time. Also many dispatch rider photos I have seen did not have number plates at all, but as this model did I was obliged to paint them. If my hand had been steadier the numbers would have come out as well. Typically from my photo survey they had 2 letters and 3 or 4 numbers on the plate.

Now as my painting table is clear I have no idea what will be up next so no expectations and nothing planned, but I will need to start something soon or I will have nothing to show when I post again, hopefully on Tuesday.

So that's it for today, have fun, take care and enjoy the weather.


Friday, 5 June 2015

Paint Monkey and 3 officers walk into a bar.

 Yes another ridiculous blog title. But  here today we have 3 WW1 Officers  including one mounted on a horse. Again all painted by me and for my mate Matt for his growing ww1 collection. I am told they are "Great War Miniatures" but when you don't source them you never really know, that said I have no reason to believe I have been misled.

You will kindly note that they all have white armbands. This is Matts choice of coloured armband as I am informed that Matt intends in the very distant future to use them as Royalist troops in A Very British Civil War. Whether this comes to fruition or not is anyone's guess but with Matt and not me at the helm it is likely to happen.

So back on Historical figures for the end of this week and a few more figures for Matt.

Not very much more to say about them so I will leave it short and just wish you a very pleasant weekend.

Thanks for popping by Clint


Wednesday, 3 June 2015

Rusty Necrons started

Well who would have guessed that? Me doing some Games workshop figures. I know I really do. Quite unexpected. So over the last few days I have started (very slowly) to repaint my warhammer 40K Necrons. This all came about as I played a game with my nephew ( I used Tyranids)and being fair I did quite enjoy it. I lost of course but that only (in this instance) spurred me onto getting these painted. So I started with a test run and repainted every part of it in GW "Tin Bits" coloured paint. It took 2 coats but eventually I had an even coat and a base to work from. So then I took GW "Boltgun Metal" paint (a dull silver/steel metallic) and very roughly highlighted the figure. And I do mean roughly. Then I applied liberal amounts of the "Rust" paint from model mates,  As you can see I have ended with a very corroded finish to the Necrons. Clearly this is wanted it worked on my space rats and I think it works here as an antidote to the nice and shiny Necrons that most youngsters paint following the guidelines in the GW Codex and stores. I hasten to add that I have nothing against shiny Necrons, it is just that you see them all done that way in stores these days and I wanted something different. Therefore I went for a corroded version.

As you can see all parts of the necron "army" will eventually succumb to the rust treatment, but these are only test figures and done as a trial. But in this photo the scarab base has also been treated in the same way. I did at first try to run the "Rust" into the groves but as it is quite viscous it did not work too well and did get most places despite my intentions. So I have decided to turn that into a plus and not a negative. This may seem wrong but I am happy with the result.

I must admit that I have been heavy handed with the rust paint as they have supposedly been hanging around for millions of years as it mentions in the background. I don't know about you but IF I had waited a million years or so I would expect at least a layer of dust to be coating all the surfaces! It has been voiced that in the far future they would have found a way to make metal non-corrosive. Well the truth to admit they might, or they might have other non decaying materials that will last a million years. But to my mind a million years is a totally unfathomable time. It is not like waiting a 4 sleeps until Christmas like you did as a kid it is much longer than that. As such no one on this planet earth will know for certain how things will decay over that time period. So maybe they will develop anti rust and anti dust materials that will last a million years and maybe they will not. Even if they do there may be other reasons that they would not use that material. It could be something as simple as expense, after all stainless steel has been known about since at least 1821 but we still build cars that rust! Or it might be that the planet surface they have been on is particularly corrosive. Or Maybe there was no vital ingredients when they were produced. Or perhaps the non corrosive material was just not tough enough for battle. Who Knows and more to the point who is going to be nit-picky enough to argue about it.

That's it for today I shall have something Historical next time (Promise).

Take care have fun, all the best from Clint

Monday, 1 June 2015

11 More WW1 Germans (Paint monkey)

Well back painting for Matt. Yes today we have a further 11 WW1 dismounted German cavalry. Not so very much to say, just more of the same and the blue/grey has come out looking more blue in the photos, just like last time. The auto correct seems to be doing this now still they look right in real life and that's the important thing.


A mixture of makes with many head-swaps and now safely back in Matts collection. Allowing me to get on with some of my own in the next few days as to what they will be though I have no idea.

Sorry it's so brief today As I have not been having such a good time recently, but with luck that is behind me and I can step onwards once more.

Cheers Guys.


Friday, 29 May 2015

Moon scape part (2)

Just going to get this one in today and then no more until Monday. Yep next blog post will be on Monday.

So starting with the top 3 photos we have the moon boards now sealed with PVA white wood glue (Resin W) mixed in with black and brown paint. This helps to cover up the sand colours before painting. I use a ratio of 3 parts paint to 1 part glue and 1-2 parts water. I am sorry I can't be precise on the water as I go by viscosity and that will vary with the make of paint and make of glue.

The most important thing is to make sure everything is coated and the boards are sealed as we go not want all the sand coming away or rubbing off. (Some does eventually I know but it can be minimised with sealing and gentle handling.  As you can see in the second photo the repair is no longer noticeable (bottom left corner of the large crater. You will also note a slight uneven ridge on the left where an old crater has been removed.  Now to my thinking this looks good and not at all bodged giving the boards a more natural feel. If anyone makes an issue of this I will simply say maybe a crater hit there eons ago. But no one will, well no one who has not read this and wants to be a smart arse!

The third Photo again shows some slight depression or ridge where a crater has been removed. And before much paint goes on I think it looks like a credible moon scape.

Painting is really quick. I really mean that. Both boards were painted in about 30 minutes total. I am not precious when it comes to colouring these boards as I just want to get it done to an acceptable level without the need to sweat and swear at the boards.So That's the plan for me. I use a mixture of Black and white Acrylic from the works (two tubes for £5) and that does the whole lot with about as much left to spare.

 Painting is all done with a 42 decorators brush from the 99p stores. There really is no need to use anything smaller or more expensive. The bigger brush covers everything very quickly and you don't mess about trying to get it to look perfect. You just get on with it, no fuss, no stress and no hassle.

I start dry brushing from a very dark grey and just keep adding white to the mix when ever I run out of paint. And needless to say the lighter tomes tend to be on the most prominent features. It may not be like that in real life, I don't know I have not been to the moon. But for me it looks right and I am happy with it and that's what counts as far as I am concerned. technically it may very well be different, but if it is I will never know. So without degrees in "astrophysics" or similar I am Okay with how it looks.

All in all this remodelling took about 5 hours from start to finish (Not including paint/glue drying time) so something most could do over a long weekend. It does take longer if you are starting from scratch but I was not.

I hope you like the look of the new boards and I hope/plan to get a game on them in the next 6 months if not sooner as my UFO project comes to life.

Thanks for looking today, have a good weekend and treat yourself as I am sure you deserve it. I shall have a beer tonight with my evening meal before you ask.

All the best Clint out!


Thursday, 28 May 2015

Re Landscaping my Moon Boards. (1)

Firstly let me get the book keeping out of the way. I have had to change the play by blog game back to a Napoleonic naval engagement as opposed to WW1 Dog fight. The planes at 1/300th scale were just too fiddly for me. So expect an update about that soon.

OKAY now on to what I have been doing. I was impressed by the response that the UFO project elicited so impressed that I have started to adapt my moon scape boards. I had too many craters on the boards I had made about 5-6 years ago. I have already done a step by step walk through on how to make them on the blog, when I was asked to make some for Ainsty Castings

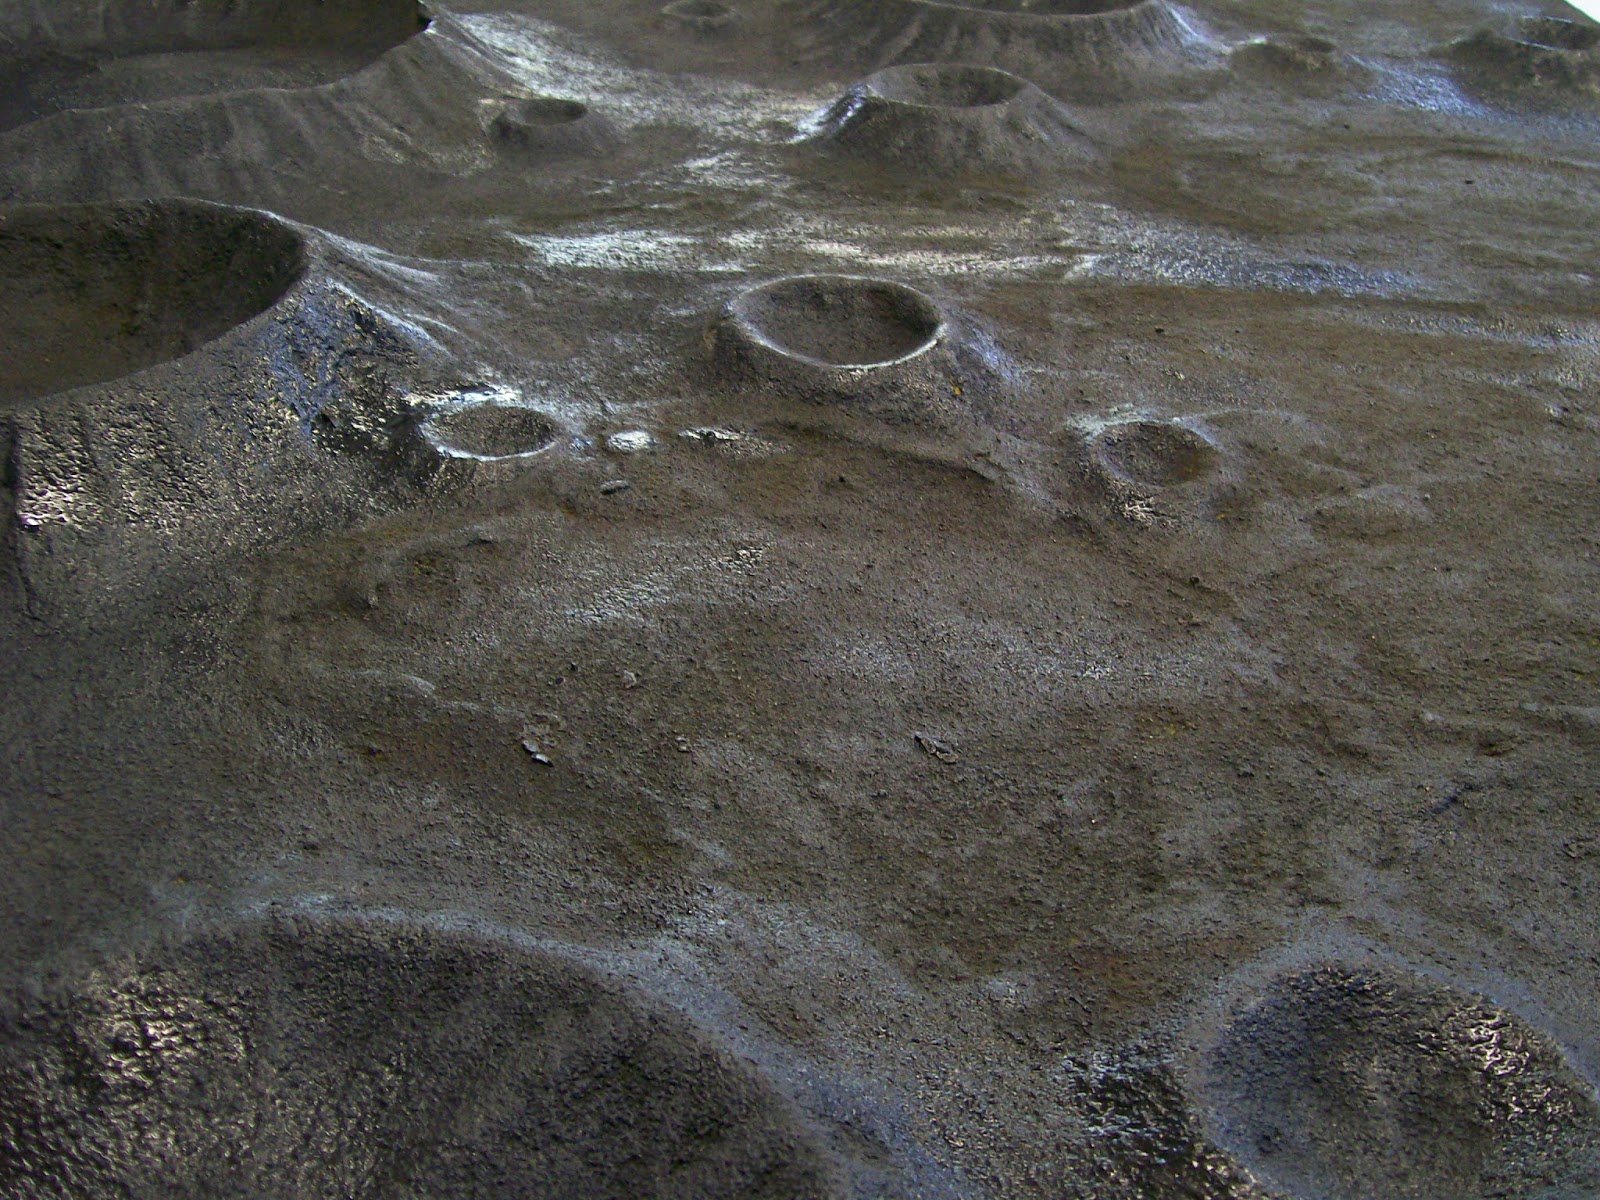
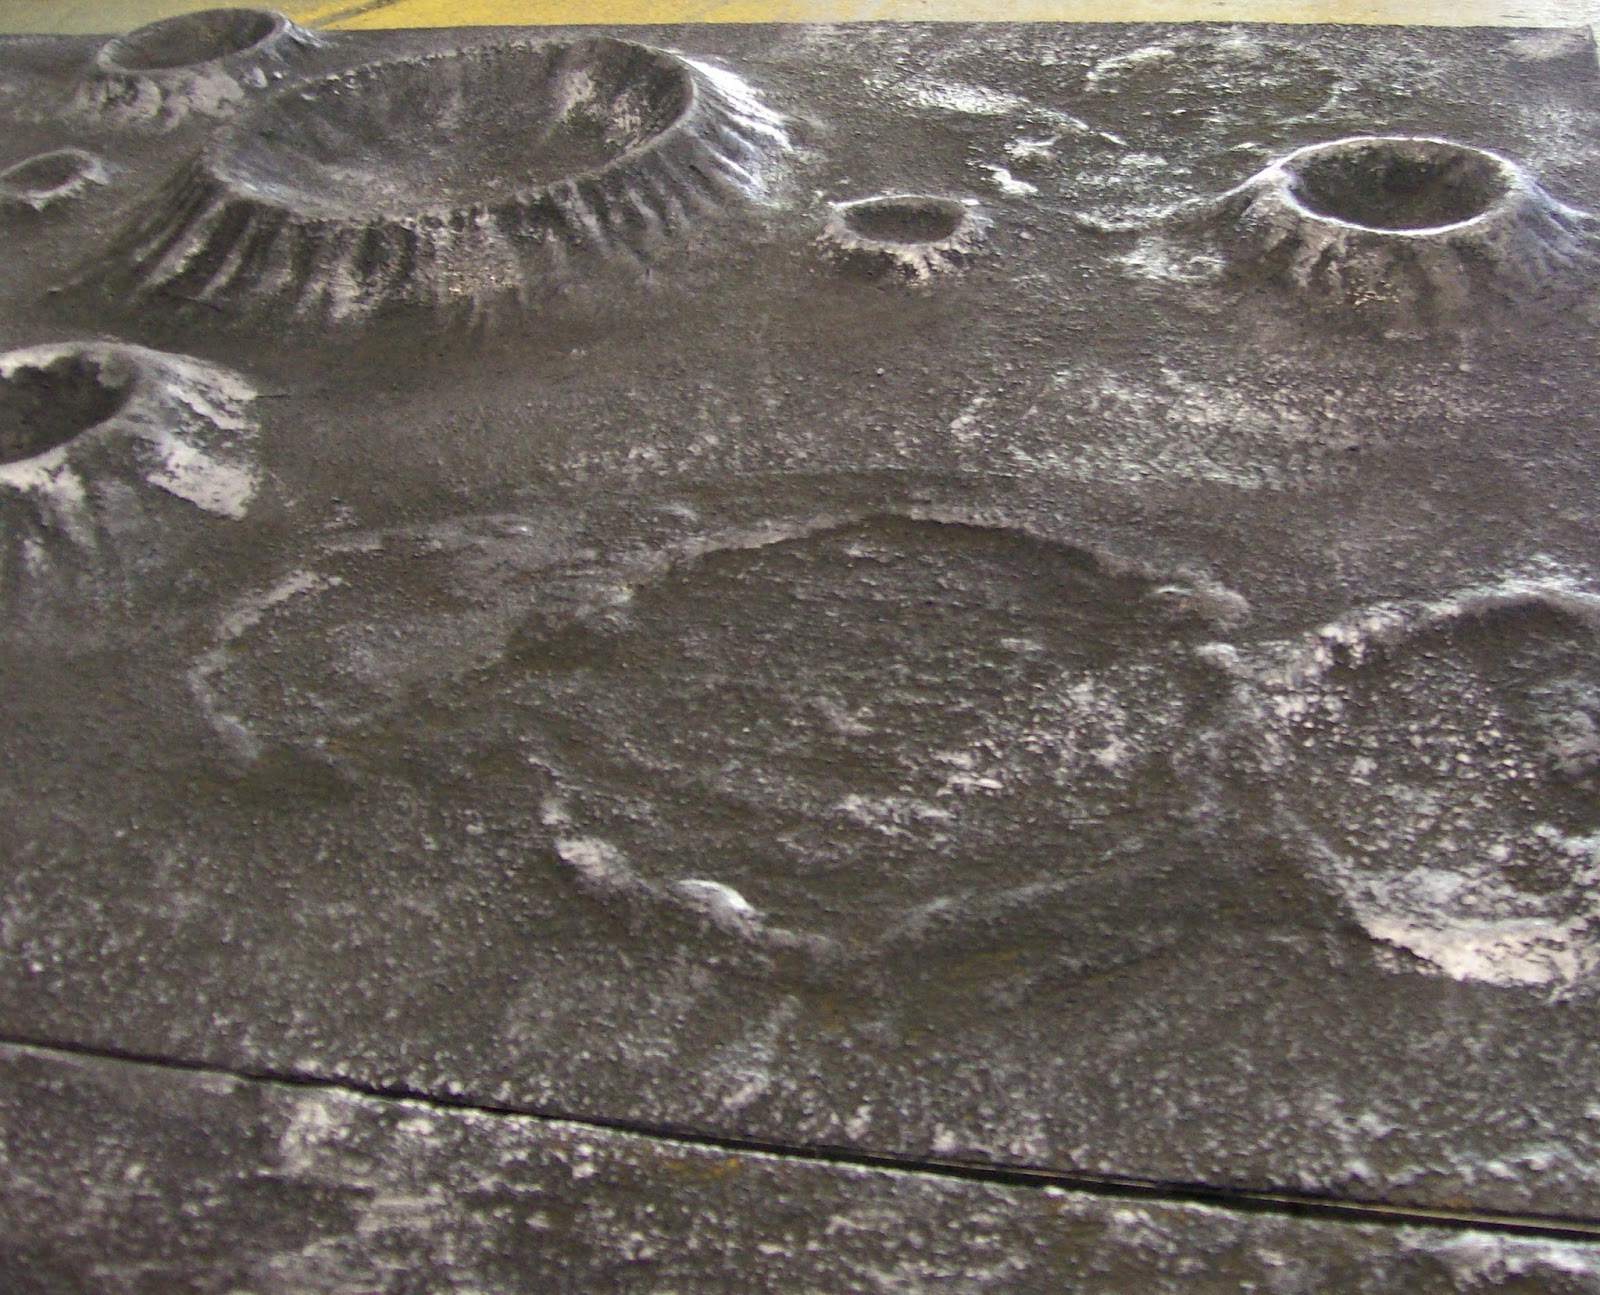
So using a trusty hammer and wood chisel (long since blunt and now really in need of sharpening!) You can see from the first 2 photos one finished board and one that I have savaged! While the third photo shows some destruction of the second board.  All in all I removed about 1/2 the craters from each board which gives some open flat(ish) areas for movement and possibly for the inclusion of a moon base. (Very long term plan do not even suggest it at this stage or someone will want to see one next week).


The removal of the craters did take a while, as they were well stuck down. But Finally I did get the two boards to the correct crater density to open area ratio. (At least in my mind). A lot of the time was me thinking "Shall I get rid of that one or that one, or maybe those two!" But I finally got there and in the photos you can see the MDF board beneath. I kept most of the bigger craters including the one 17 inches across. As it really is easier to put things in them, figures vehicles, dice etc!and it breaks up the uniformity of the boards.

Eventually I was content, and even did the happy dance. As most of us will know the joy of using a hammer! It was not all easy going several times I removed one crater and another came with it OR  I damaged a crater that was in close proximity I am sure you get the idea. But for once I did not blame my self. The wonderful thing about the moon is that I have no idea where the craters are or should be and so as long as it looks right it is right.


 Repairs were the next stage. As you can see from the photo opposite . So with a trusty roll of masking tape I patched any damaged craters. You can clearly see the system I used overlapping strips of tape to get the slopes of each crater. I know it looks rough, but trust me if done methodically and consistently the technique works. One of the reasons it works is that I do not have people continually poking it to see what it's made of, if you want to know just ask it is easier all round than prodding and poking.


The next photo shows the next step. Having mixed up some paint and white wood glue (PVA (Resin W if we are being technical)). At this stage colour was not an issue as I know it will have several more coats to get the right texture and rigidity. So yes for a very short time it was a green colour. But we are talking minutes and nor hours as before it could dry I sprinkled the areas with building sand (The cheapest I can get). I applied a thick layer to cover as much as possible and not to leave any gaps. I continued the process on any other areas that needed patching. Lots of fun and lots of mess so if you ever try this method do not do it in the house, or you will get nagged and with good reason!

Giving  about 40 minutes tor the paint and glue to dry I simply poured the sand of the board swept it up and put it back in the bucket ready for the next coating.


 The process was repeated 3 times using plenty of sand, plenty of glue and plenty of paint. In fact so much paint I have to get some more today when I am out. As you can see in the photos you do get sand everywhere and paint/glue a lot of places too, so I do all this stuff in the garage well away from anyone who might complain. I also have a tidy up afterwards as well. Thrust me it's best to do so!

After a while the boards start to take on the right texture. And by using 3-4 coats of paint/glue/sand will get tough enough to play on. No they will not stand up to being run over in a car but are totally suitable to play on.

With waiting times it will take several hours so perhaps it is best left overnight, just to make sure it is dry. Yesterday for me though was a nice hot sunny day and things were drying very quickly in fact several times the paint and glue was dry before the sand was sprinkled on! In Which case it was re applied in smaller areas and a patchwork was built up. But while it was hot and sunny I pressed on with the task.


 In a couple of areas the previous texture was lifting and was creating very small ridges. Rather than fight against it I went with it. Only about 3 mm and rather than worry about it I just applied more paint glue and sane and rejoiced in the slightly uneven texture knowing that when all was dry they would add some low level relief to the boards.

When I was OK with how it looked, I used up the last of my black and dark brown paint and sealed all the areas that had been transformed. Photo not shown. And that is where I have left it over night already to start today when I get some more paint and glue. If it has dried how I hope I will just be on the colouring up today and the boards will be finished by the new week. As is more likely they will require another coat of paint glue and sand they should be ready by the end of next week. So I will show them when I get to stat stage. There may also be some half painted photos as well just as WIP.

That's it for today. Thanks awfully for the enthusiasm of the UFO project it has pushed me onwards over the last few days. And I have now reached a stage I need to restock on modelling supplies before I start again.

Take care, have fun and tune in soon for another update, or maybe something different.
Cheers from Clint

(Post Script) I have a new Avatar as the first time in my life someone guessed  who I was named after! It is no secret I was named after Clint Walker but no one has ever guessed before without being told or at least very strong clues being given!

Tuesday, 26 May 2015

UFO 7TV

I must be honest this idea only came to me at Salute this year. But now that I look back I was probably only going to end up here anyway.  Back when it first came out I was not a fan of the TV series "UFO" by Gerry Anderson much preferring other TV series like "Colditz" or even Captain Scarlet (and the Mysterons). But in the past few years it has grown on me. Without knowing it I first built a moonscape, well that is to say I knew I was building it and was enjoying it, but was never really aware why. I don't mean that in a "Close encounters of the third Kind" build a mountain, I am sure you get what I mean. I was building it as mostly I just wanted to. I even painted up a handful of astronauts but not really enough to do anything with telling myself that at the time there just was not enough astronauts figures to make the project viable as well as the fact that I could not find any suitable aliens in space suits. So the Project did not go anywhere after my initial burst. (That is just so me!)

Then a chance conversation with Tim at the wargames club where he mentioned the various "Dinky" diecast toys from the period. When I was a kid one of my best friends John had this toy. Not this actual one but this diecast model. Anyway I asked Tim what scale it was but he was unable to tell me. It was about 40 years ago so I could not remember. So I looked it up online and still could not find an answer so I looked for the cheapest I could get on eBay just to get an idea.

While I know I will never get an exact scale, looking at the seats inside the cabin I would say that it is about the right scale for a 28mm figure. From that realisation it quickly became apparent that a tabletop version of the now, "classic" UFO series was a strong possibility. I already had a moon scape (I will have to re-do some of it and remove about 1/2 the craters but still). I already have the Astronauts and the Aliens. (they were humanoid and wore space suits as well). I have a set of rules almost perfect for the series, and now I have a "Shado Mobile" diecast toy.


 So I have just about gotten everything I need. yes it will all need work to bring it to life, but I have all the basics.

Talking of the "Shado Mobile" considering the cheap eBay price, where the postage cost more than the product it is not in bad nick. Obviously it is missing tracks and also missing the rocket. But as you will never fire the rocket using the spring on the diecast model the missing rocket is the least of my worries. It will need a new coat of paint to hide all the chips and scratches but that is stock in trade for wargamers!

 A couple of the axles are also bent, but as I will mount it on a base and not "trundle" it across the floor as most kids wouldhaving bent axles and no tracks is a modelmakers bread and butter. For a start I could take the tracks from another model kit, or I could use an elastic band of the correct size and width or I could make them from plastic as they are now not going to need to move. So overall while I know I will sweat and swear at it and myself I am very happy and expect to realise this project in the next few months. Well at least the start of it.

So now back filled with vim and vigor I have a new and unlikely project to fulfil.

Thanks for tuning in, and I hope this project excites you as much as it does me.

Cheers from Clint


Sunday, 24 May 2015

Reginald Evans (28mm Zombie and survivor)

Reginald had anger management issues even before the zombie apocalypse. He hated his job as an IT teacher in a secondary school. He hated the other staff, his wife and most of all the kids. But that was OK he was hated back with equal measure. This all meant that most of the school kids learnt nothing from him. But then the zombie apocalypse came along and computers, Mr. Evans only real friends, all died.

So taking up the first implement that came to hand, Reggie, as his mother still called him, his wife just called him "the tosser", let loose his bile his anger and his frustrations Not only on the latest version of windows but every computer and zombie he could
find.

Here we see Reginald Evans and his alter ego after the zombie threat. Clearly in the out break period of the zombie apocalypse before he dresses and arms him self for survival. While a dustbin lid is not a recommended tool for urban zombie survival, if it's all you have I am sure you will be glad of it. Maybe it will double as a shield. While parrying is only semi useful in this setting anything that will keep the grasping hands away has got to be a good thing.


Both Figure and survivor are  from "East street Games" And are part of the civilians pack. Unfortunately at this time they are not sold separately so you will get all the survivors and their dead/undead counterparts all in one pack.

Available here  CLICK THIS LINK.  I am sure you will forgive the dodgy camera work and the very dodgy brush work. I have kept all the clothing the same colours on both models and as he is armed ONLY with a dustbin lid have taken this to be in the outbreak phase so the zombie still has a human like appearance. Yes the blood has stopped pumping but the dead figure has literaly just been turned into a zombie so the blood has not as yet pooled at it's feet around the ankles. I did find the figures fun to paint but the details on the castings were not obvious until paint was applied, which did lead to a few errors on my part and a couple of areas repainting. But overall I am happy with it.

I hope you have enjoyed what the other wargamers have done with their versions. All the best. Enjoy the Bank holiday Clint.

Friday, 22 May 2015

WW1 British Medical team

Well as mentioned 2 days ago here are the WW1 British medical team. Just 3 figures and starting from the left. A Dr, and two medics or simple stretcher bearers that's up to you to decide.

The Dr could pass as any senior officer. I say senior officer as he is opening a gold cigarette case. It always strikes me as odd just how many Dr's and Nurse's smoke in England. They of all people should know and be aware of the dangers. Still it is their life and if that's what they want who am I to complain. But I will anyway. So this figure along with the others in the medical team are unarmed and should in theory not draw any fire from either side. We all know that the reality might be different at times, but generally this was adhered to.

In the Centre is a more general medical orderly. While you may think of him as a Doctor I tend to think he is slightly more experienced than just a stretcher bearer. He carries a blanket to cover a body or corpse with should the need arise.

On the right we have the afore mentioned stretcher bearer.  As it takes two, or more people to move a loaded stretcher he will no doubt team up with the medical orderly to move a body. All three of these should make a team but I suspect the Dr would be safely away from the very front in a field hospital or aid station.

Again all three figures are for Matt and his growing WW1 collection. And I have some more German Cavalry on the paint table to come along soon. But I hope to have a break and get a figure of my own done over this Bank holiday Weekend.

Just before I sign of until Sunday I would mention there was an earthquake here last night. Not a big one and no-one got hurt as far as I am aware. But It did make the local and national news, and yes I did sleep through it!

Have fun, take care and all the best from Kent!

Wednesday, 20 May 2015

Paint Monkey does Waving not Drowning!

Matt gave me some British to paint. World War one British. I have asked him and he said they were a mixture of companies so I cannot tell you which figure relates to which company, so hard luck if you want to find a specific figure. He also gave me a couple painted by Ray Rousell for me to try and colour match. I have not shown those as I do not want to have a comparison made, that would be neither fair to Ray nor myself.

Firstly some signallers, 3 figures I believe each from different companies or at least different sculptors. The one in the middle is a much rougher sculpt than the other two but he's waving his flags and seems happy to be doing so. While the one on the right has his flags furled and also carries a rifle, while the others are unarmed. To me this waving flags malarkey strikes as one painting a "Shoot Me First" sign on them but I guess when the wireless is not present one has to adapt and use what is available. Still it does not strike me as the safest occupation!


I am really not sure what Matt will do with this one either but he did mention some VBCW Anglican forces. So I guess they will benefit from a Vicar. Actually without being glib I think most forces would given the lack of atheists on the battlefield. he was a terribly nice figure to paint though and I thought sunglasses might suit him better than prescription spectacles for Myopia. I think I am right in saying this may be the first ever WW1 Vicar I have painted.

Well that's it for today. Thanks for popping by. I am just finishing 3 more British WW1 figures so you may expect them in a couple more days.

All the Best and TTFN Clint