Showing posts with label Terrain. Show all posts

Friday, 21 September 2018

The Moon's a Diarylea carton (Part 2)..... and relax

Well as you may remember just 5-6 days ago I posted (Part 1) and this is part 2 the final part. Well at least final for now.

Most of the rest is repetitive to do and needs to be left alone overnight. Perhaps longer if you applied the sand paint and glue mixture to thickly. THEREFORE do it somewhere it will not et disturbed, that is dry and no one  else wants to use and NO ONE minds if it gets dirty. IT WILL>

You will need 3 or preferably 4 (or more ) coats. It all depends on how much repair you are willing to do and how roughly they are to be treated.

Mix up the paint, glue and a small drop of water. You will know how much water with experience, and the only way to get experience is to do it! As a staring place I would suggest a LITTLE water. As it is just to thin the paint and the glue. I Try to use about 1 part water to 6-8 parts paint, it all depends on how much glue is already in the mix.

Paint the boards with this mixture. And then using a sieve sprinkle sand on the boards, making sure to cover all of the boards with first the paint/glue mixture and then again with the sand.
DO NOT try to brush the sand off!
Wait overnight (at least 25 hours preferred). For some people (Author looks sheepish) this is the hardest part

Repeat as mentioned above a MINIMUM of 3 times. (each time does make it stronger, BUT you do lose a little definition. So Plan on it taking 4 days  MINIMYM.


Remove excess sand at each coat. I find simply tipping it works very well. Repeat the tipping on all sides to make sure you have all the excess sand off before starting the next coat.

Keep the sand safe and use again on later coats.

If it is clumpy It has not had long enough to dry. Which means It has had too much water in the mix! If it is clumpy leave it alone for 2 more days (Perhaps longer is the weather is wet>.

While each step only takes 30 minutes or so, but drying time is MUCH longer.

When you are satisfied (remember a minimum of 3 coats and ample drying time). Paint it with emulsion paint your base colour. feel free to water the emulsion down a LITTLE as it then gives better coverage. If you water it down to much it will need 2 or perhaps more coats. (But usually not)

Leave it to dry (Again) overnight.

The final stage is to dry brush the op colours on. I use a 3"  or 4" brush for speed Bought in a pack from Poundland.

You will need to work up through the layers until you get to the highlight coat. So while you do TRY to keep brush marks out it is not a complete disaster if some occasionally show in the early stages.

Later coats will make any brush strokes less visible. feel free to work the colour into each and every contour. The boards if done properly should at this stage be strong enough, unless you are very heavy handed or super strong and determined.  But if you are maybe making terrain is not for you.

This stage should not take long if you have all the preparation done. If you start to early the sand will clump and you will struggle to get a good result. But I honestly finished the painting of both boards at this stage within 30 minutes. Preparation is the key and waiting for it to dry properly is VITAL.

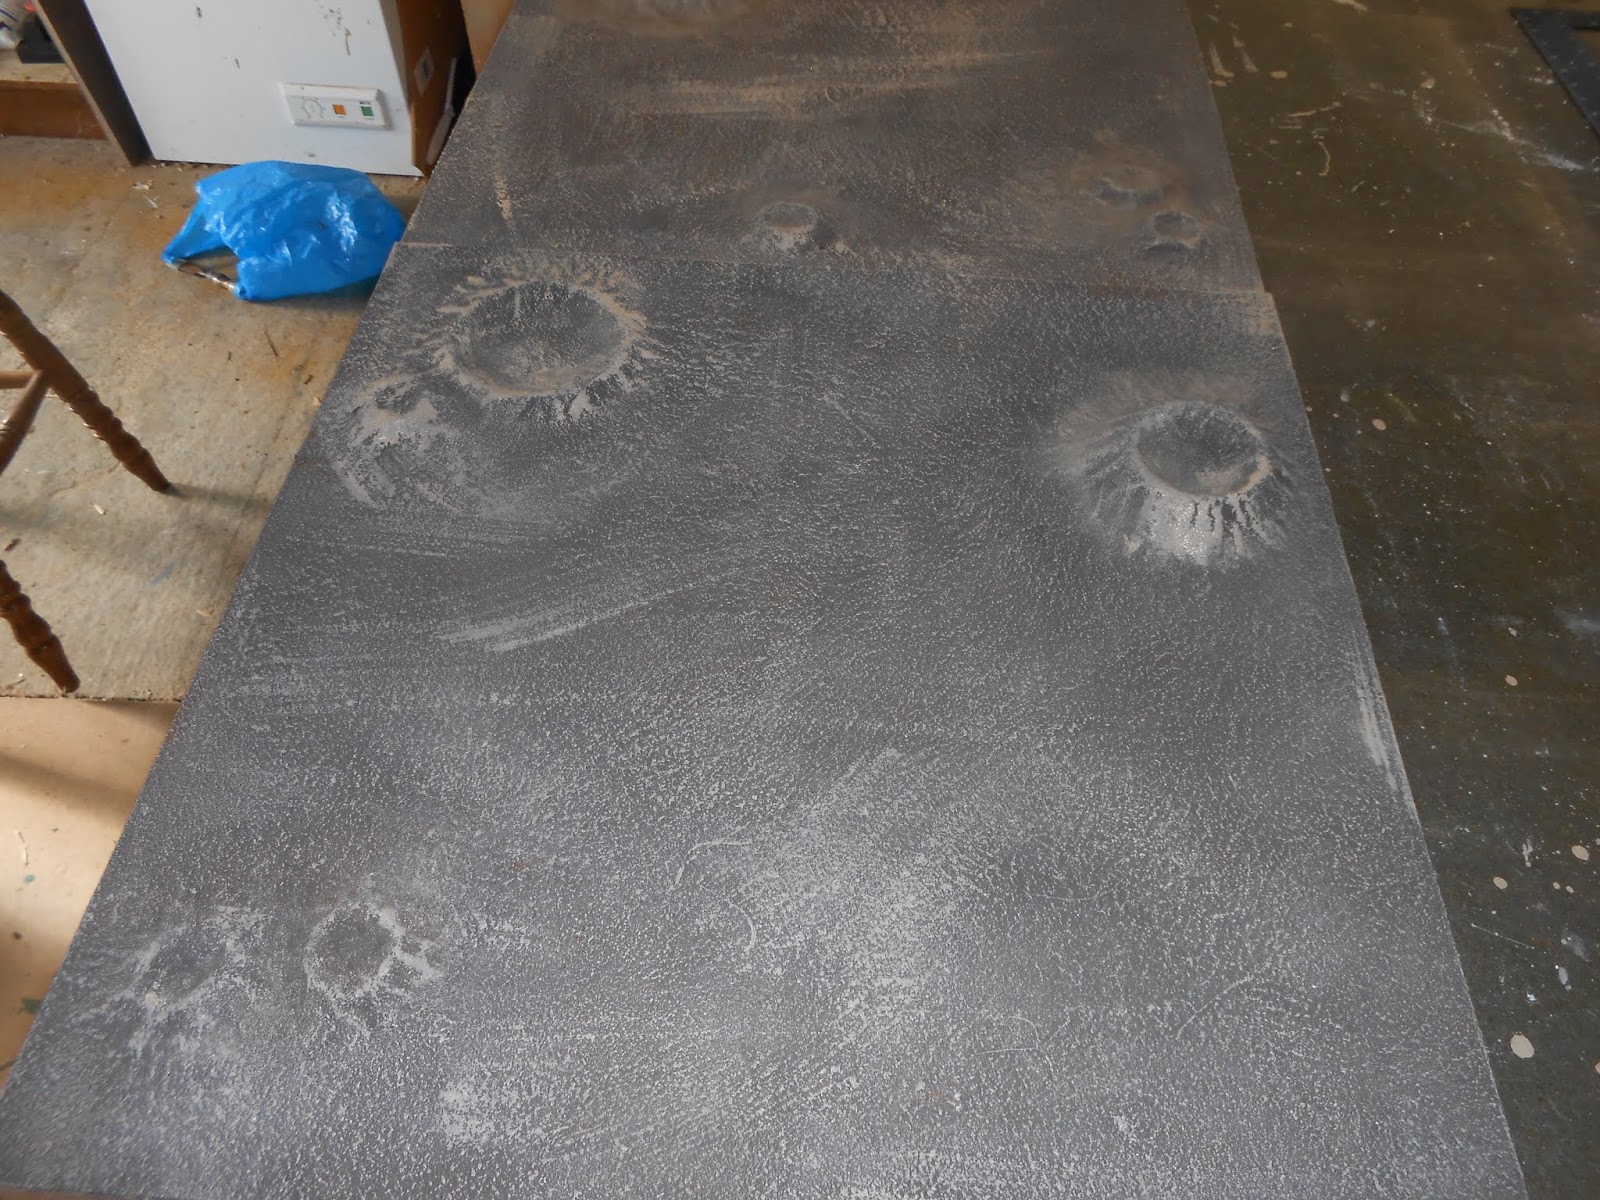
DESIGN: When I made my first boards I had too many craters. So be aware of that. These boards have far fewer and are designed to allow other terrain features to be added later.

I decided on some open areas for 2 reasons. Firstly I did need some additional terrain , such as buildings (I will start a Farm in a week or 2), 2 because not every inch of the moon has been hit by a meteor, 3) some open spaces make a better game I have found.  (too much cover leads to a certain type of game and too little cover also leads to a certain type of game.

Finally:These 2 boards bring my moonscape (as I call it) up to an area of 6 foot by 4 foot. And if need be I could make it MUCH larger, limited only by time, storage and money. Ido not at this stage need a larger area so 6x4' is where (at least for now) I will stop.

Thanks for looking. All the best Clint


Saturday, 15 September 2018

The moon's a dairylea carton! (Pat 1)

Starting place
Well sort of but it's also loo or kitchen roll tubes as well as several other things When It comes to making terrain I will use anything. The limits are what does it cost, will it work, and what will it look like!

I wanted to make some more "Moon" boards for 15mm sci fi. (well any scale sci fi really!)  That being the case I  have started! Long time followers will no doubt recall the process.

Here is a quick walk through of how it is made.

Firstly you  need a board of the right size. My other boards are 2'x4' so these will be 2'x2' It will offer a great deal od variety that way.

Starting the Craters
 Craters are the most time consuming of all  the processes. Firstly take a tube and cit it down to the right height. No one can tell you what the right height is you will have to judge it for yourself. But as a word of warning LOWER is better! so 1=2 cm for a roll of masking tape size tube!

Next build up SEVERAL(3-4) layers of tape.  These will go from the inside to the outside. They need to be firmly "squished"  down in the centre and at he edges. They also need to leave a hollow triangle section which make up the slopes of the crater. Just look at the picture and see what I mean. Right you understand now! (I hope)
Keep going it takes a while!

It takes much longer than you think and you will use up LOADS of masking tape. Luckily "Poundland" currently has 4 rolls for £1. So if there is one local get it there. I use masking tape you 2 reasons. Firstly the Cost. It's cheap. Secondly it has a mat textured back and that makes it easier to attaché the sand to! Feel free to use something else and if It works better let me know. Currently I know Masking tape works and it's cheap and that is why I use it.
Do all the craters


It's common sense but do all the craters at one time. Yes it is boring and time consuming but I know this way works and I also know that other than the wood (which does cost a bit) works out cheaply. It really does, materials costs were less than £1 for 2 boards each measuring 2' x2'. And lets be honest that is less than a pot of paint!


add the sand texture!
This is the messy part. DO NOT DO THIS INDOORS. Mixing up a LITTLE water White PVA glue (Actually called Resin W by people who know) A coloured water based paint (either acrylic or Poster or Emulsion) I use all three at different times (NOT TOGETHER). And Brush it on the boards. Now I use the cheapest brushes I can get (5 for £1, from "Poundland") and at that price it is easy enough not to care about them. before the Paint mixture with the PVA is even nearly dry I sprinkle (via a sieve) builders and on the board. I use Builders sand because it is cheapest and one you have a bag that will last you years.

That is he process. It is not hard at all but does require some patience, practice and hardest of all some common sense!

Part 2 to follow later this week,as It takes some time to do it! And I have yet to get as far as a finished board this time out. I plan on showing it NEXT weekend! (that shall encourage me to get of my fat lazy bum and get some terrain done!)

Off to a small local show tomorrow so a show report and loot on Monday. Until then, take care and paint something!

Thursday, 19 July 2018

2 steps back wards

Well that is what it feels like. It really does.

That aside. I have been working on my 6mm (1/300th scale) Cold war stuff. I know It does not amount to much, but here they are.

They are Heroics and Ros (LINK) miniatures of BTR 60's . While not a front line cutting edge APC in 1985 they were still used and I for one have always liked them. This is enough for a company of Infantry transport. Perfect for a Nava regiment or for very front line troops of a satellite country. So Perfect for me should I do an invasion of Turkey! (Which I have mentioned before).

You have 3 platoons each of 3 vehicles and a HQ Platoon of 2 vehicles. (One command vehicle and 1 security vehicle from memory).

Easy to paint and get finished which is why I am showing them today.

As I wait for the post to deliver at least 2 parcels I have started a terrain project. I hope to have more to show on Saturday. If the parcels arrive and if I get more done I will show then. But for now just realise that not everything is new, sometimes I take old projects and revamp them and this is a case in point! Do not guess what it will be as I assure you all shall be clear in days yet to come and I zoom out and don't crop the photograph.


Until such times keep plugging away and get what wargames stuff done as you can. And rest assured that I am as well, but not always in the foreground!

All the best Clint

Thursday, 21 June 2018

3 different things

I have no excuse I get side tracked by the world cup! Certain of you I can hear "Tutting" as I type this. But here at least is what I have done!

Firstly some barrels. These are 28mm Ainsty Castings ( http://www.ainsty-castings.co.uk/) Find them in the Cargo Hold section if ordering online or just ask Andy is a nice guy and worth a chat if you see him at a show.)

I went for a VERY simple paint job. Simply gun metal followed by a Black wash. This should make them useable from about 1910 on to sci fi! Stuck them on MDF Bases, as you can see 4 on one base and 2 on another. It was either this or have them run around loose and risk loosing them.

So a quick and easy thing to get going with. No problems and easy to do an quickly managed and all done and dusted and very versatile.


Now at times I can be dense. (I know who you are and I can see you nodding!) At the Broadside show on the flea market there was 2 guys selling off some old "Snapdragon Studios" Castings. I can honestly say I wish I had purchased more from them, These 2 cost me £2 unpainted and they wee the only 2 of these they had. As far as I know Snapdragon only produced in 2 scales, 6mm and 28mm. That does not at all bother me as I do intend to use these as power generators on my 15mm sci fi boards! (See later). But with nothing to Scale them against and being science fiction how would you ever know!

In Retrospect I should have put something on to scale these. Oh well live and learn, (In my case sleep and forget it all). But I am very happy  with these and as hinted at they are without scale so could be used in any sci fi scale. Shame you just cannot get snapdragon any moae I used to really like them but could never afford to buy much.


Lastly for today! I hyad a little think and it has occurred to me that I might be better using my "Moon" Boards as and "Any-scale" sci fi terrain. Yes I know I am slow if off the mark and most of you would have thought of this before!


The conclusion of this epiphany is that I shall now need to repaint my 1/300th scale sci fi stuff from Ice Planet to desert planet! There fore here are 3 Civilian vehicles (Painted red so as not to be at all camouflaged). I started painting them red as they were going on an Ice planet and I did want them to stand out! But as it turns out bright red works almost as well for a desert planet! Lots more (2 armies) to do for these but at least I now have a start and can continue at my leisure..

That's it for today. I hope to have more on Saturday until then, take care paint if you can. All the best Clint


Tuesday, 5 June 2018

Sci Fi Scatter

Terrain workbench
Yep still on the terrain building. This is the scatter terrain I have finished SO FAR. Yes that does imply I have not finished. In fact I already have some started and at the show on the weekend I shall try to buy/acquire more.

The joy of making terrain is you can use anything, additionally it can be any scale particularly if doing Science Fiction which I am.
Wargames Terrain Workshop

Here are 2 Crystals from Wargames Terrain workshop. They have been seen on the blog before, but never used.

I did have to make and paint 2 new bases so they now match in with the terrain but all in all a quick fix and easily done. I suspect they will e for sale at the show. And it all comes down to how much I manage to sell. I am in two minds wheter on the clumps to stick with this colour or to change it up and go for Blue?  I will most likely wait and see what cash I have on the day and what is available at the show. Rochester Wargames and Train siop will be at the show and I know they will stock WTW so I will Just have to wait and see.


 Craters. Yes Built by me. On the workbench I have 5 finished and Until I make additional boards these 5 should be MORE than enough.

Again as you can see from the colours they fit onto the boards very well. One would almost think (and Rightly so) that I used exactly the same colours straight from a tin! The problem is the more scatter terrain you have someone (quite often me as it happens) decided the board can be "Improved" with. When sometimes more terrain make it just too cluttered.


 Next up are two hills. Trust me they are there they are just painted to blend in. I already have another hill on the work bench and can see several more being needed. These are a small hill at the back and a medium hill in the centre. Three more hills are planned but they should (fingers crossed) be gentle and easy to traverse. More on the gentle hills if/when I get them done.

You never know there may be some at the show and then money may stop me from getting all I could possibly want!


 Vegitation. In an ideal world I would have more of this. I shall NEED to keep my eyes peeled. these came as of casts from £land when I was looking to get jungle trees. The bases again were repainted to blend in with the terrain and they do now look the part. I am reluctant to buy more from £land as I only got 3 for the £ and I quite possibly need a LOT more.


Yet more Crystals from Warrgames Terrain Workshop, this time in BLUE. I like the blue a lot as they do stand out on the boards. So I am in 2 minds if I should stick  with the blue or get some of the maroon. Both options have merits and I am sure I will enjoy pondering the outcome and then on the day buy the wrong ones! These are mounted on square mdf bases which have been painted and textured to fit in with the boards.


Planned terrain. Clearly I need some buildings but other than that I am looking for what ever looks right. I shall enter the show with an open mind and see what is available.  I do plan to make a "farm" but I know from experience that players will try to identify the components. This does tend to P*SS me off as they are quick to criticise and SLOW to do anything themselves. I will need to overcome this thought process in my own mind if not in theirs. I will of course show any workings on a  "Farm" as it happens and as I get further along. At Present I am thinking of using fizzy pop bottles as the farm base and to hell with the critics.

That's it for today. I really do need to get my armies prepped for the show and if not sold prepped for EvilBay.

Take care, have fun and paint like a crazy person!


Wednesday, 30 May 2018

Terrain Work in progress WIP

Nothing finished as yet. I just could not get up the shed yesterday to do anything. I can hear you all playing very tiny violins! So at present this is unfinished.

My Sci fi "Moon Boards had suffered due to a number of reasons. So I decided to update them.
 I did decide to turn them into a crater infested desert. So I first painted them cream. the top 2 pics show them after 1 coat. But 1 coat of paint was simply not sufficient. So over the bank holiday weekend I painted a second coat.
 As you can see the board on the right has had a second coat and is now dry. The board on the left just one coat and ready this day for a second.

each board as long term readers will already know is 2' by 4'. So they are not all that small and yield a 4' square area.

If you are a new reader you will not have seen them as I do not use them very much which I thought was a shame.


2 coats on both boards. But still I was not happy. They needed to be darker and show a greater level of contrast.


 So on the Bank holiday Monday I went to the local DIY store and promptly bought the wrong shade! It is of course too dark!

Consiquently I repainted the boards again, only to realise when they dried. that they were too dark. Woops

So the dry brushing started! I added about equal amounts of cream paint to the brown and applied the first coat.


 All went well and I got another good nights sleep. Let's have no false modesty the boards did took good.


So yesterday I applied (despite the thunder storms) a lighter dry brush. And it has made a difference the boards have improved again.

I am now happy with the boards. Does That mean I am finished.... of course not! But I am currently on a pause


I have started 4 extra craters 3 hills ( a large a medium and you guessed it, a small) as well as 3 rock spires.  As well as some blue crystal areas. Additionally I have given thoughts to what buildings might be like. Do not tell me that this or that company make good buildings. While I am sure they do I want something less generic that every player has and having a degree in Architecture I feel I can design some buildings that will be more appealing to the terrain.  I already have ideas and will attempt to bring the ideas to fruition. in the next few weeks or months. So say nothing about buildings as what suits us in this century may  not on a different world in the next.

Additionally I shall restart my 15mm sci fi. Which I have always loved but just could not play at a club level due to any number of reasons, until lately! The next stage for me is to repaint the bases of the figures I already have to match this terrain. I did look at repainting all the figures as well but have decided to compromise and just do the bases as it will be quicker.

So as far as I am concerned 15mm Sci Fi is a GO! once more


Saturday, 12 May 2018

Very little painting

Well a mixed bag today. As the title says very little painting. But here goes.

Firstly here are 4 15mm figures. They are from the Bodyguard pack by Peter Pig AK 47 Range. I just had 4 figures left over an they were doing nothing so I thought "Why not?" I did not have an answer so it was either get them painted and ready for wargaming or leave them to rot in the lead pile. I have painted these up as professionals so they shall join my AK force and while not big enough to be a unit in their own right they can always be lumped with the professional troops should the need arise.

Just 4 15mm figures painted and based and now ready for action. I did wonder about the colour of the berets finally settling on Blue (Generals Bodyguard have white) as blue and white are the national colours. LOL but they were very nearly yellow.


Inspired by some of your comments about Aeronef boarding actions I decided to make a cheap board. So I nipped in to Poundland and bought 2 packs of floor tiles maybe I should have bought 3 but this will tell me if the idea works. My thought is that if I coat them in the old blue peter "Sticky back plastic" (also bought from Poundland) the floor tiles will act as the base board for minimal expense! I Will let you know if this works. My initial thoughts is that it will, but I have no idea how 1) easy it will be (I am hoping for very) and 2 Light and portable it will be (Again hoping for very). As always you shall be the second (After myself) to know.


And Finally I succumbed!  I bought the Rule book Maximillian '34. I do intend a review after the club have seen it and I have finished reading it and I will be most interested in how it compares to Gaslands . So no review yet but initial thoughts are positive, with all rule sets you always think why have they done it that's way and what if. But so far so good. But be aware there is not a lot of BACKGROUND about the world setting in the book but that can be positive as much as negative.

I shall give more details when I have read it unless I hate it in which case it will hardly be mentioned again.

Have a good weekend. Al the best Clint

Thursday, 3 May 2018

Faith and Trust and some going backwards

Original board
But finally going forwards. It is easier to start again sometimes and yet sometimes we have a spark in the original that makes us stick with it. After a sleepless night I decided to strip the original board down and use what I could so with a panel saw and a hammer I saw the initial work destroyed. Not wanting to sound either cynical or complacent I knew it was not up to it and I knew I could do better.

Theerfore the new board will be 3 foot square and on several (not sure yet 0 levels. This is what |I have decided so far.

It is Important to recall that most wargames boards are FLAT! I just did not want that. This board is to represent a hidden "Canyon" perhaps packed with mysteries. As such I dismantled the back wall of the original board. It as would the other pieces not be free standingand thus be able to be moved into different board positions. As such I created a separate base and back for it. This allowed me to address the straight board edge and instead go for something slightly more natural looking. Noy perfect but working with the materials at hand.

 Creating an L shaped (in section) base also allowed me to enhance the cave areas and incorporate the caves onto the boards. The cave as seen to the right is embryonic at this stage and as such does need a LOT of work. But now at least I have a framework to work with.  You can see on the bottom right a second cave area drawn out but not implemented. Several attempts at planning and only one out come. That is the way of it.

From the side it is a total mess and some level of faith in my ability is needed sometimes it is lacking as I am filed with self doubt.
I do use a variety of different polystyrenes mostly to get a variety of thicknesses to try to create a more natural feel. It does not always work.

 To be honest Sometimes I need to walk away and come back a day or a week later. Then when you do you kind of guaranteed that you will either not have the time or the weather will be dreadful but eventually you find you can overcome these issues and move to the next stage.

And this is the next stage. I mixed up filler from Wilkos and using it coated some bandages.. I will know later today if these have dried out sufficiently well. Early indications are that they have. If so I can and will move on to the next stage over the weekend. .

By the way if I have not mentioned it I hope-plan to have this all (3 foot board) finished by February and shall enjoy blogging each step be they forward steps or backwards steps.

I thought to do this as a beak from painting Tanks. but be waned there are more of those coming. With luck I also plan on getting some Victorian Science fiction done as well.

Until Sunday when I plan to post again, take care and paint if you feel like it
all the best Clit

Thursday, 26 April 2018

Lewis Gunners and Tea chests.

 Well painting for the club members again. The figure on the left (with the finished base) is for Matt. While the two on the right are for Richard (aka Dick).
Starting with Matts figure it is converted and as such has a head swap. This is not a problem for me after all I did not do the work, I just slapped the paint on. It will go with his VBCW collection. I have painted it to fit I with almost any of his factions so It may be a fascist or a miner or an Anglican or well you name it.


The two figures on the right are painted for Dick. They are Ironclad miniatures Miners. Richard did not provide bases or give any indication or how he wanted the bases done. Therefore I have had no input on what exactly he wants so I have left them bare so he may base them. When I paint for Peter at the club (some very soon, hopefully tomorrow) I am instructed not to base them as he will do that himself. Consequently I have left an email for Richard but have not yet received a reply.  And to be honest unless I get one this morning this is how I will hand them back to him.

Finally for me some Ainsty castings Tea chests. They all came in one pack are enough scatter scenery to edge the dieselpunk project just a tiny bit closer. For those younger then myself you may never have come across a Tea chest! I only vaguely recall them from when I was 5 years old. They were used after that time but I have no personal recollection of them at later dates.

Needless to say they were what tea was transported in from China or India to the UK. As such they were wooden chests with metal edges. I have only used 2 colours of brown for the wood as they are just scenery and will get shot by players (no not literally) as figures take cover behind them on the big airships and in the warehouses.

That is it for today. Please enjoy any weather and have as good a day as you possibly can.

All the best Clint